BMW E46 ABS ASC/DSC Module Replacement Guide
Full PDF Guide with lots more photos attached to this post!
Guide OverviewFull PDF Guide with lots more photos attached to this post!
This guide has been created to help people who need to change their ABS ASC or ABS DSC Module.
For ABS ASC/DSC troubleshooting and diagnosis please see the guide ‘BMW E46 ‘Trifecta Lights’ Diagnosis Guide’.
How to Diagnose 'Trifecta Lights'
BMW E46 ‘Trifecta Lights’ Diagnosis Guide Feel free to comment with any corrections or modifications and I will amend accordingly. I don't profess to be an expert on the subject but I've tried my best. Guide Overview This guide has been created to help people who encounter a common E46 issue...
It is highly recommended to read this other guide to help with BMW Standard Tools related issues and to gain a deeper understanding of the process.
The information in this guide has been collated and researched from reliable sources but like any user-made manual, the accuracy of the information cannot be guaranteed. It is advised that you conduct your own additional research and if necessary, consult a professional BMW car mechanic. In no circumstance shall the author be liable for any loss or damage.
Source Material
- BMW E46 Car Owner’s Manual
- Bentley’s BMW 3 Series (E46) Service Manual 1999-2005
- Haynes E46 Sept 1998 -2006 Manual
- BMW Complete Diagnostic Fault Code List
- BaliDawg’s BMW Standard Tools Guide: How to Install BMW Standard Tools
- Silverdogz’ DSC MK60 Replacement Guide: DSC MK60 replacement and INPA Install
- Spannerhead’s DSC Replacement Guide: ABS/DSC Module Replacement
- BMW-North’s Bosch 5.7 DSC Replacement Guide: e46 Bosch DSC 5.7 replacement and coding ABS Module
- 50s Kid DSC Replacement Guide:
- 50s Kid E46 Brake Bleeding Using INPA Guide:
- 50s Kid E46 Brake Pressure Bleeding Guide:
- 1fast6’s DSC MK60 Replacement Guide:
DSC MK60 Module Replacement and Recode DIY
Hi All, Ive been doing a load of research over the last couple of weeks after my DSC module on my 09/01 330Ci decided to die and leave me with the three lights of death on the dash (no abs, no dsc, no traction control). DIS short test followed by fault code read pointed to control unit failure. T...
 www.e46zone.com
- Porsche Network’s ABS Pump module Guide:
- LM Auto Repairs’ DSC Coding Guide:
- MaxVQ’s NCS Expert Coding Guide PDF
- REAL OEM 318i Diagram Selection:
Formal thanks to the following individuals for taking the time to help diagnose the original issue:
- BaliDawg, Silverdogz, Overboost, Orb, jmo69, RRRM8E and MrMCar
ABS ASC/DSC Module Replacement - Overview
If trifecta diagnosis confirms or strongly indicates an #5DF5 error and other potential causes have been eliminated, then your car’s ABS ASC/DSC module most likely needs to be replaced. The replacement process requires a physical change of the module itself and then a coding and calibrating procedure using INPA, NCS Expert, and Tool32. The process is fundamentally the same on all E46s, but on certain E46 models the ABS ASC/DSC module is located underneath the master cylinder. If so, the master cylinder and brake reservoir will also need to be removed.
This step-by-step guide will focus on the procedure for replacing an ABS ASC Teves ATE MK60 Control Module on a 2002 E46 318i BMW. However, it should be useful for anyone wanting to get an understanding for how to replace any E46 ABS ASC/DSC module.
For more information about other module replacements, check out guides by:
50s Kid: BMW E46 DSC (Dynamic Stability Control) Unit Replacement & Coding!
BMW North: e46 Bosch DSC 5.7 replacement and coding ABS Module
Silverdogz: DSC MK60 replacement and INPA Install
Spannerhead: ABS/DSC Module Replacement
ABS ASC/DSC Module Replacement – Note about BMW Standard Tools
BMW Standard Tools is a suite of software including INPA, NCS Expert, EDIABAS ToolSet 32 and WinKFP
INPA is a diagnostic interpreter program that communicates with your car using BMW’s own factory developed Electronic Diagnosis and Information protocol (EDIABAS). There are different versions that people have refined and added to over the years which contain different functions, car models and language variants. They operate by accessing different parts of the car’s electronic communication system to read saved and live data from the car. It is worth noting that sometimes using INPA you are going to have to read outputs that are displayed in German. But using online translation software resolves this.
NCS Expert and EDIASBAS ToolSet 32 are additional software packages that can communicate with the on-board computer and perform coding, diagnostic and calibration functions. WinKFP is used on E46 to update software on DME and EGS modules.
The simplest install of BMW Standard Tools is a download and guide put together by BaliDawg at the following link:

How to Install BMW Standard Tools
This thread describes how I install and configure BMW Standard Tools, the suite of BMW software that includes INPA, NCS Expert, WinKFP, Tool32. I have my own custom way of doing this that is the shortest and simplest steps I could figure out. This set up is for E46 only. What is needed...
To perform the steering angle calibration procedure, you can either use EDIABAS ToolSet 32 or use a version of INPA that has steering angle calibration functionality. The version of INPA by BaliDawg does not have this functionality for MK60 modules, but it can perform all the diagnosis steps mentioned and can perform calibration for MK20 and Bosch 5.7 control modules. If you purchase a K+DCAN cable online they are often accompanied by a version of INPA, many of which have the steering angle calibration procedure for MK60.
ABS ASC/DSC Module Replacement - Tools and Parts
1. BMW Standard Tools (INPA, NCS Expert & Tool32)
2. K+DCAN Cable (with switch)
3. Gloves
4. Paper Towels
5. 9mm Spanner
6. 10mm Spanner
7. 11mm Flare Spanner
8. 13mm Hex Socket
9. Extension Bar
10. Ratchet Drive
11. Flexi Reach Magnet
12. Turkey Baster
13. DOT4 Brake Fluid – 1L
14. Funnel
15. Brake Bleeding Tube and Bottle
16. Car Jack
17. BMW Wheel Nut Socket Wrench
18. BMW Safety Wheel Nut Adaptor
19. Replacement ABS ASC/DSC Unit
20. Optional: Trolley Jack
21. Optional: Power brake bleeder
22. Optional: Battery tender/maintainer
23. Optional: Axle Stands
ABS ASC/DSC Module Replacement – Find the Right ABS ASC/DSC Control Unit
Step 1: Locate your ABS ASC/DSC Unit.
Conduct a visual investigation to find out where the ABS ASC/DSC unit is located. Depending on your E46 model it will be situated either in the back left or back right of the engine compartment, normally next to the master cylinder and brake booster.
Step 2: Find the ABS ASC/DSC Control Unit BMW Part Number
You probably won’t be able to see the BMW part number of the control module itself. However, you should be able to see the hydraulic pump’s BMW part number. You can use this part number to figure out the complimentary control module BMW part number.
Please check your part numbers online this list was collated manually and may have errors
o ASC Pump 34.51 6751767 = Module 34.51 7751768 (Teves ATE MK20 ASC)
o ASC Pump 34.51 6756286 = Module 34.51 6756288 (Teves ATE MK20 ASC)
o ASC Pump 34.51 1164896 = Module 34.51 1164897 (Teves ATE MK20 ASC)
o ASC Pump 34.51 6759073 = Module 34.51 6759075 (Teves ATE MK60 ASC)
o DSC Pump 34.51 6750364 = Module 34.51 6753842 (Teves ATE MK60 DSC)
o DSC Pump 34.51 2282250 = Module 34.51 2282249 (Teves ATE MK60 DSC)
o DSC Pump 34.51 6784763 = Module 34.52 6784764 (Teves ATE MK60 DSC)
o DSC Pump 34.51 6757387 = Module 34.51 6756292 (Teves ATE MK60 DSC)
o DSC Pump 34.51 6763959 = Module 34.51 6764088 (Teves ATE MK60 DSC)
o DSC Pump 34.51 6765452 = Module 34.51 6765454 (Teves ATE MK60 DSC)
o DSC Pump 34.51 6759045 = Module 34.51 6759047 (Teves ATE MK60 DSC)
o DSC Pump 34.51-6750383 = Module 34.52 6750345 (Bosch 5.7 DSC III)
o DSC Pump 34.52 6762115 = Module 34.51 6762113 (Bosch 5.7 DSC III)
o DSC Pump 34 51 6769536 = Module 34.52 6769862 (Bosch 5.7 DSC III)
(ASR stands for the German word/phrase Antriebsschlupfregelung meaning ‘drive-slippage-regulation’. From my research I couldn’t find a difference between using an 6759075 ASR or ASC module).
Step 3: Purchase your ABS ASC/DSC Module Control Unit
- Typically, they are sold with the hydraulic pump still attached.
- Try to source one from a more recent model than your own. Preferably 2003+ if possible.
- I purchased mine for £28 on eBay.
Step 1: Drain Brake Fluid (Easier with 2 people)
- Jack up the back-left of the car at the jack-point. (furthest wheel from ABS ASC/DSC unit).
- Remove the back-left wheel using wheel nut socket wrench and BMW safety nut adaptor
- [Optional] Put axle stand under axle as a safety measure during procedure
- Remove brake fluid nipple valve cap.
- Attach bleeding tube and bottle.
- Note: You can find DIY brake bleeding kit tutorials on YouTube.
- With someone ready in the driver’s seat, undo brake fluid nipple nut with a using a 9mm spanner. The person in the driver’s seat should pump the foot brake manually to expel brake fluid until no more fluid comes though the bleeding tube. Afterwards re-tighten the brake fluid nipple nut.
- Note: It is possible to access the bleed nipple valve with the wheel still on. But removing makes it much more accessible.
- Use turkey baster or syringe to manually siphon any remaining brake fluid from the brake fluid reservoir.
Step 2: Detach brake fluid sensor connector from fluid reservoir
- Press in on the clip to undo sensor connector.
- Place loose end of the connector away from the working area.
Step 3: Detach boot lid sensor connector
- Press in on clip to undo the sensor connector.
- Place loose end of the connect or away from the working area.
[Step 4: For manual cars, detach braided hydraulic clutch system supply line.]
- Plug the end of line using a bolt to prevent fluid leakage or contamination.
- Keep the clutch supply line supported and above the clutch master cylinder to prevent any air bubbles from reaching the clutch hydraulic system.
- [E46 model featured is an automatic so no images available of this step]
- [Optional] Label the six brake lines 1 – 6 so you know how they attach to the pump. Practically it is hard to put the brake lines back in the wrong position, but you may find it useful.
- Take a photo of the unit making sure you can clearly see how the brake lines attach to the pump. You will notice the brake lines don’t screw completely flush with the unit. It will help to have a visual comparison for when you reinstall the lines later.
- Use the 11mm flare spanner to undo the nuts. It is important to use a flare spanner (also called flare nut/ brake line spanner) so you don’t round the nuts. It also allows you to slip the spanner head over the lines and down onto the nut giving much easier leverage than a normal 11mm spanner.
- Watch out for brake fluid spillage. Use paper towel to quickly mop up any spills. Be particularly vigilant around electrical connectors.
- [Optional] Place the brake lines in sandwich bags to prevent brake fluid dripping from the disconnected lines.
Step 6: Unplug the DSC electronic communications cable
- Pull the tab to full extension
- Note this can be quite stiff particularly as it may not have been moved for 15-20 years.
- Once the tab is at full extension the connector should unplug easily.
- [Optional] Place the connector in a sandwich bag to protect from brake fluid and grease.
Step 7: Undo the hex bolts connecting the mounting bracket to the car.
- The ABS ASC unit is mounted on a three-pronged metal bracket.
- Note: Different E46s have different module mounts. Search online at REAL OEM for diagrams.
- At points ‘A’ and ‘B’, a 13mm hex bolt screws into a rubber mounting grommet seated in the bracket.
- At point ‘C’, the rubber mounting grommet slides onto a hex support rod.
- Use a 13mm hex socket on an extension rod with the ratchet drive to undo the 13mm hex bolts at ‘A’ and ‘B’.
- Once the hex bolts are loose, use the long flexi-magnet to easily remove the hex bolts.
- Note: You can also use the flexi magnet to correctly seat the hex bolts when reinstalling.
- Once ‘A’ and ‘B’ have been removed the rubber grommet at ‘C’ should easily slide off the hex support rod.
Step 8: Remove the ABS ASC/DSC Unit from the Car with the Mounting Bracket Attached
- Move the two brake line hoses with flexible joints can be easily moved out of the way.
- The four less flexible brake line hoses need to be carefully manoeuvred.
- It is a bit of a quite a squeeze but gently lift the brake lines over and around the unit and orientate in a way which allows the module/pump along with the mount to become free.
- Undo the 3 x 10mm bolts that connect the mounting bracket to the pump/module unit using 10mm spanner.
- If the replacement control module did not come with a hydraulic pump, detach the old module from the hydraulic pump and connect the replacement module to the pump.
- Screw in the 3 x 10mm bolts using the 10mm spanner
- Work through the procedure in reverse inversing each step.
- Use photos taken at Step 5 as a visual comparison when reinstalling the brake lines to ensure brake lines are correctly installed.
- Be very mindful not to cross thread the brake lines
- Use a funnel to minimise spillage.
- Top up brake fluid to the maximum level ensure you don’t overfill.
- Note: Allow time for the brake fluid to pass through the filter whilst refilling.
Step 1: Attach K+DCAN Cable to Car OBDII Port and Connect to Computer
[Step 2: Connect Battery Maintainer]
- Using a battery maintainer ensures that the battery will not go flat during the process.
- Coding and Calibrating is extremely draining on the car battery. Whilst, it is possible to use certain computer functions with the engine running for some of the following procedures it is not possible.
- If you want to attempt without a battery maintainer, work in quick bursts on the computer, turning car ignition key to position 1 (Off) between each of the steps to prevent any idle time
Car Ignition Position 1: Electrics On, Engine Off
Car Ignition Position 2: Electrics On, Engine On
Car Ignition Position 3: Electrics On, Engine Cranking
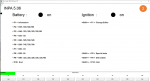
Step 3: Read Errors using INPA
- Turn car ignition key to position 1 or 2
- Load INPA
- C:\EC-APPS\INPA\ BIN\INPALOAD.exe
- Press F3 (E46)
- Select ‘Chassis’
- Select ‘DSC_MK60’
- Press F4 (Error Memory)
- Press F2 (Clear Memory)
- Press F1 (Read Memory)
- Should see error #5EF1 ‘VIN not initialised’
- Turn car ignition key to position 1
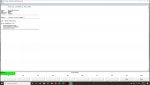
- Load NCS Expert
- C:\NCSEXPER\BIN\NCSEXPER.exe
- Click ‘File’
- Select ‘Load Profile’
- Select ‘Expert Mode’
- Press F1 (VIN/ZCS/FA)
- Press F3 (ZCS/FA f. ECU)
- Select ‘E46’
- Select ‘AKMB’
- Coding information is now displayed
- Note: If AKMB does not work try EWS
- Press F6
- Press F4 (Process ECU)
- Select ‘MK60’
- Press F3 (Execute Job)
- Note: If you do not have a MK60 module it may require a different coding procedure in NCS Expert
- If the coding procedure has worked the lights on the dashboard should change to:
- ASC+T/DSC Light – Yellow/ Amber
- Brake Warning Light – Yellow/Amber
DSC MK60 modules use steering angle sensor inputs to perform the DSC functions. The steering angle sensor needs to be calibrated in order for these the control module to perform DSC function correctly.
ASC MK60 modules do not use steering angle sensors as they are not needed for ASC functions. However, to clear the #5EF1 error you need to perform the calibration.
Step 1: Attach K+DCAN Cable to Car OBDII Port and Connect to Computer
Step 2: Calibrate using EDIABAS ToolSet32 or INPA
Using EDIABAS ToolSet 32
- Turn car ignition to key position 1
- Centre steering wheel
- Load EDIASBAS ToolSet 32
- C:\EDIABAS\BIN\TOOL32.exe
- Click ‘File’
- Select ‘Load SGBD, Group file’ in the File menu
- Browse to and select the corresponding PRG file for your ABS module family
- Teves MK20: C:\EDIABAS\ECU\DSC_E46.PRG
- Teves MK60: C:\EDIABAS\ECU\DSC_MK60.PRG
- Bosch 5.7: C:\EDIABAS\ECU\DSC57.PRG
- Browse the list of jobs for one called ‘test_lenkwinkel’
- Double click ‘test_lenkwinkel’
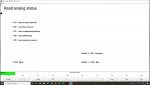
- As mentioned in 'Note on BMW Standard Tools', to calibrate using INPA the version you are using needs to have the steering angle compensation routine function for your module. The following outlines the procedure for MK60 calibration enabled versions.
- Turn car ignition key to position 1
- Load INPA
- Press F3 (E46)
- Select ‘Chassis’
- Select ‘DSC MK60’
- Press Shift+F4 (Compensation Routines)
- Centre steering wheel
- Press F1 (Compensation Steering Angle/Initialisation VIN-Nr)
- Accept Error Warning
- It warns that an error code will be flagged if the steering angle is more than 30 degrees from straight ahead when the calibration is performed.
- If successful, the ASC+T/DSC and Brake Warning Light should both have de-illuminated.
- Use INPA to recheck for errors using the previously described procedure.
- The #5EF1 error should no longer be present.
If you are using a power brake bleeder please watch 50sKid video: BMW 330i 325i E46 Brake Pressure Bleeding (and Fix for Endless Bubbles)
If you have been following the procedure, the rear left wheel should still be removed from when the brake fluid initially was drained from the system.
This process can be quite labour intensive due to having to remove each wheel in turn. It is possible to access the bleed nipple with the wheel still on. But removing the wheel makes the bleed nipple valve much more accessible. To speed up the process you can use another jack in combination with the original to jack up an entire end of the car (i.e. jack up from either both rear or both front jack points at the same time). This allows you to remove two wheels at once and quickly switch between wheels when conducting the bleeding procedure.
The bleed procedure needs to be performed on each brake line working back from the calliper furthest away from the ABS ASC/DSC Module. As the E46 318i ABS ASC module is located in the front right of the car the procedure is done in the following order: Rear Left -> Rear Right -> Front Left -> Front Right.
Step 1: Ensure Brake Fluid is at Maximum Level in the Brake Fluid Reservoir.
- Ensure the fluid reservoir is kept topped up throughout the bleeding procedure.
- Ensure the end of the tube is submerged in brake fluid to prevent air being drawn back in.
- Note: If the bleeding tube has a one-way valve the end doesn’t need to be submerged.
- Note: You can find DIY brake bleeding kit tutorials on YouTube.
- Remove brake fluid nipple valve cap on the caliper.
- Attach bleeding tube and bottle.
- Note: You can find DIY brake bleeding kit tutorials on YouTube.
- The person in the driver’s seat should apply strong force into the brake pedal.
- With pressure applied, undo the brake fluid nipple nut with a using a 9mm spanner.
- The person in the driver’s seat foot should now start depressing on the pedal.
- You should be able to see brake fluid passing through the tube interspersed with air bubbles.
- When the pedal ‘bottoms out’ re-tighten the brake fluid nipple nut.
- The person in the driver’s seat should allow the brake pedal to return to its original rest position.
- Repeat this procedure until no more air bubbles pass through the tube when the brake pedal is depressed.
- Attach K+DCAN cable via OBDII port and connect to computer
- Turn car ignition key to position 1
- Load INPA
- Press F3 (E46)
- Select ‘Chassis’
- Select ‘DSC_MK60’
- Press F6 (Activate)
- Press F1 (Control Hydraulic)
- Press F2 (E46 ASC/DSC Rework Bleeding Brake Calliper FL/RL)
- Press Brake Pedal to 80%
- Open brake bleed nipple nut using 9mm spanner
- The software runs the ABS ASC/DSC hydraulic pump causing it to expel air from the module. You can hear the module click and a pulsing force pressing back against the brake pedal. Small bubbles of air should be visible through the bleeding tube.
- Once the INPA process has finished quickly re-tighten the bleed nipple nut and allow the pedal to return to its original rest position.
- Repeat this process 2-3 times until no more air bubbles come through the tube.
- Use the F3 FR/RR function for right hand side brake bleeding procedures.
- Use the F2 FL/RL function for left hand side brake bleeding procedures.
- Once the process has been completed the brake pedal should be firm with little travel.
- If the brake pedal feels spongy repeat the process.
Once you have completed the process take a cautious safety drive. Perform some lock to lock turns and emergency stop procedures. Slowly increase the speed at which you perform emergency stops. When performing you should be able to feel the ABS engaging under heavy braking. Redo any brake bleeding, as necessary. If you want piece of mine, you could always have the car checked at a local garage.
ABS/ASC/DSC Module Replacement – Enjoy a Celebratory Beverage
Well done. Enjoy a drink of your choice. You’ve saved yourself £1000+
The original thread continues below:
I'd like to thank everyone for their time ahead of reading this post.
Car: 2002 E46 318i Touring - Right Hand Drive.
I have the following warning lights displaying - 'The Trifecta Lights' Issue - (Image 1)
Brake Warning Light - Red
ABS Light - Amber
ASC+T/DSC Light - Amber
Car Manual: "If a brake warning light comes on together with the yellow indicator lights for ABS and ASC+T/DSC: The complete regulating system for ABS, CBC, ASC+T/DSC and ADB/ADB-X/DBC has failed. Drive with care [...]"
From my research into the other threads it appears to be mainly caused by:
1. Low battery voltage.
2. A faulty steering angle sensor.
3. A faulty wheel speed sensor.
4. ABS/DSC regulating unit failure.
I recently replaced the front passenger side car door check strap, during which I disconnected the battery. After replacing, I didn't drive for a few days but 15 minutes into its next journey the trifecta lights appeared. Typically, the lights display instantly from ignition but after a period of inactivity they might not appear until 30 minutes into a journey. I've been monitoring closely but can't quite figure out exactly what triggers them. Given the close proximity between battery disconnection and the error, I did a battery trickle recharge and all appears healthy with 14.4V output. As per RR8ME advice, I checked brake fluid level and all seems okay.
Most forum advice is to read error codes. Initially, I bought an AUTOPHIX OM126EU OBDII - but jmo69 and RRRM8E pointed out this could only read engine codes. Overboost and BaliDawg set me up with INPA and I purchased a K+DCAN Cable.
Please see my next post in the thread for how I have proceeded from here.
") . Specifically, the following files had failed to copy across properly
. Specifically, the following files had failed to copy across properly