This is on my 2001 330ci
Ok so my wipers stopped working on me and it wasn't any fuses or relays. It had to be the motor. I got another motor and searched everywhere for a DIY and couldn’t find one so I decided I’ll make one while doing the swap.
I am not responsible for anything that you do to your car; this is simply a documentation of how I did it in my car. If you screw something up or your car becomes damaged in any way I am not responsible – you are doing this at your own risk. If you agree than continue reading on.
Tools you will need:
-Flathead screw driver
-Torx 27 bit
-15mm socket
-10m socket
-13mm socket
-Ratchet
-Flashlight
-Adjustable or 15/16” wrench or 15/16” long socket
This took me about half hour to 45 minutes to do.
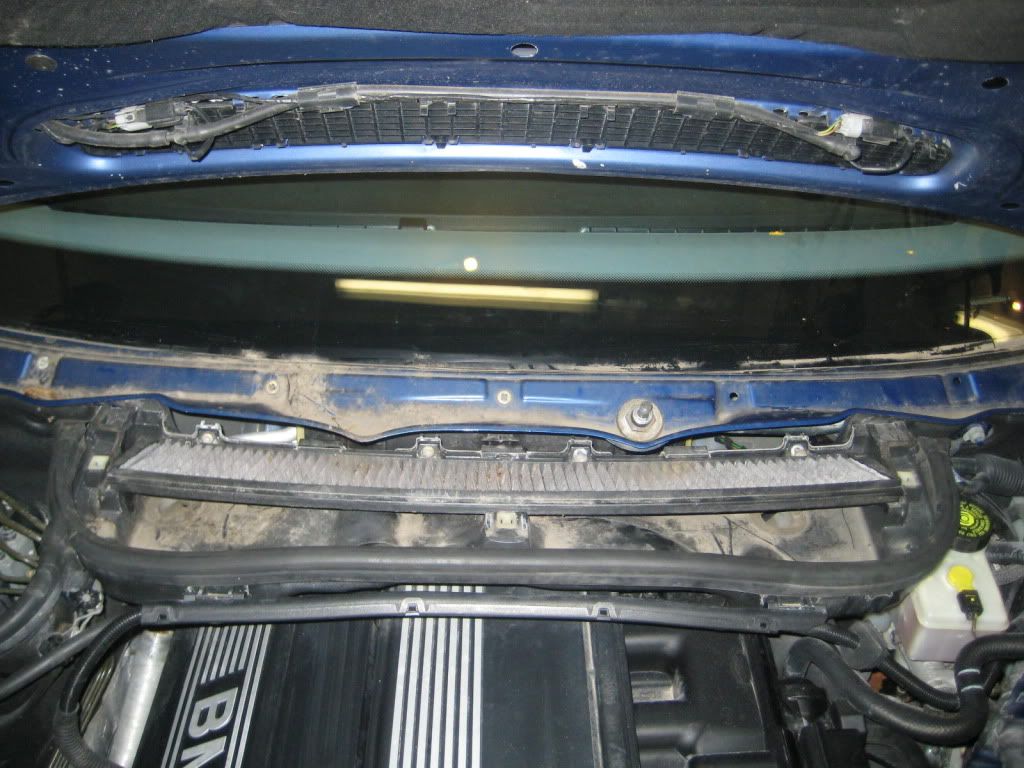
Start by opening up your hood and locating the windshield wiper arms.
![Image]()
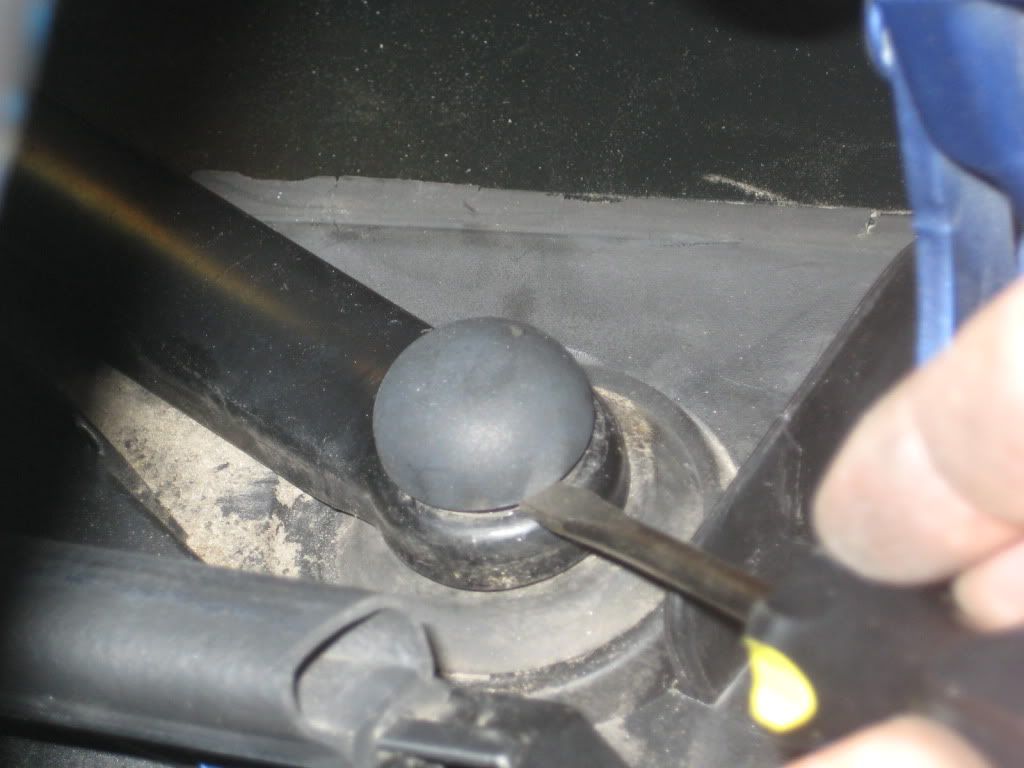
You’ll see a black rubber cap over the pivot point of each wiper. Use the flat head screw driver to remove the rubber cap to expose the 15mm bolt.
![Image]()
Take your socket and ratchet and undo the bolt. You’ll need to wiggle the wiper up and down and back and fourth to loosen the “installation element” (as realoem.com refers to it) out. You can now remove the wiper arm.
![Image]()
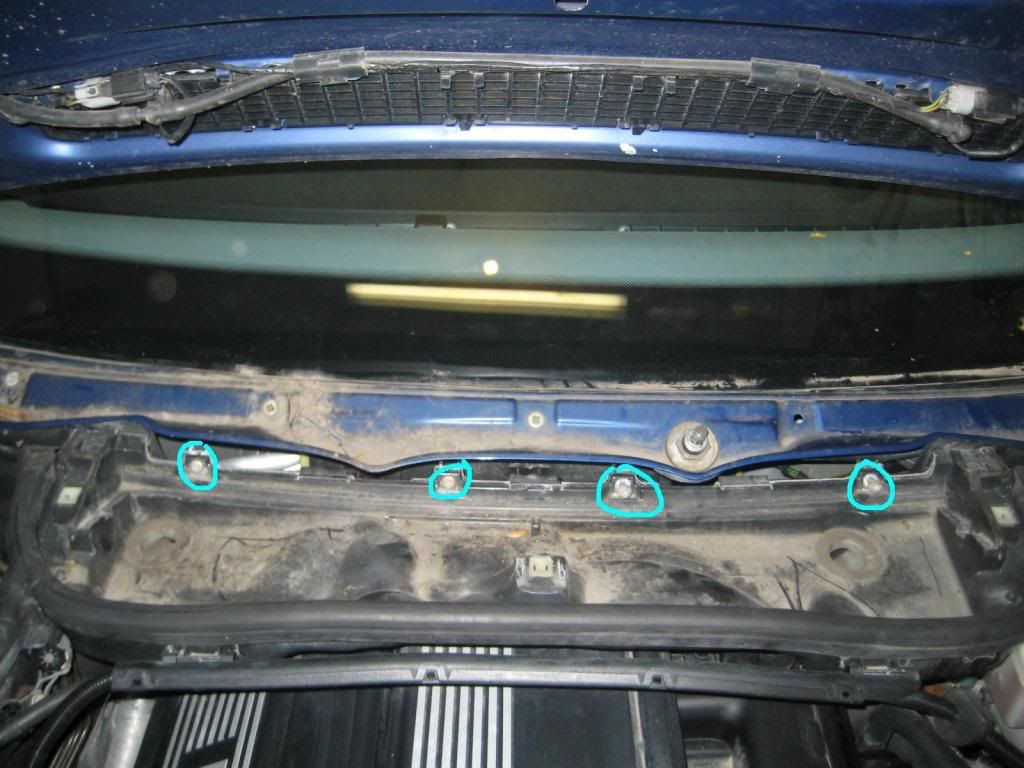
Next, undo the 3 rivets that hold the micro filter cover down (circled in red), and remove the micro filter cover. Also remove the wiper cowl, it’s held on by 7 flimsy clips. Just pull on it gently and it’ll snap out.
![Image]()
Next remove the micro filter. (You can use this opportunity to clean out that area and replace the micro filter with a new one when reinstalling)
![Image]()
Now, get your torx 27 bit and remove the 4 screws (circled in blue). After the screws are out you can pull it out of its place and flip it over so it’s laying face down. This way you can avoid taking apart all the wiring connected to the front of the micro filter housing.
![Image]()
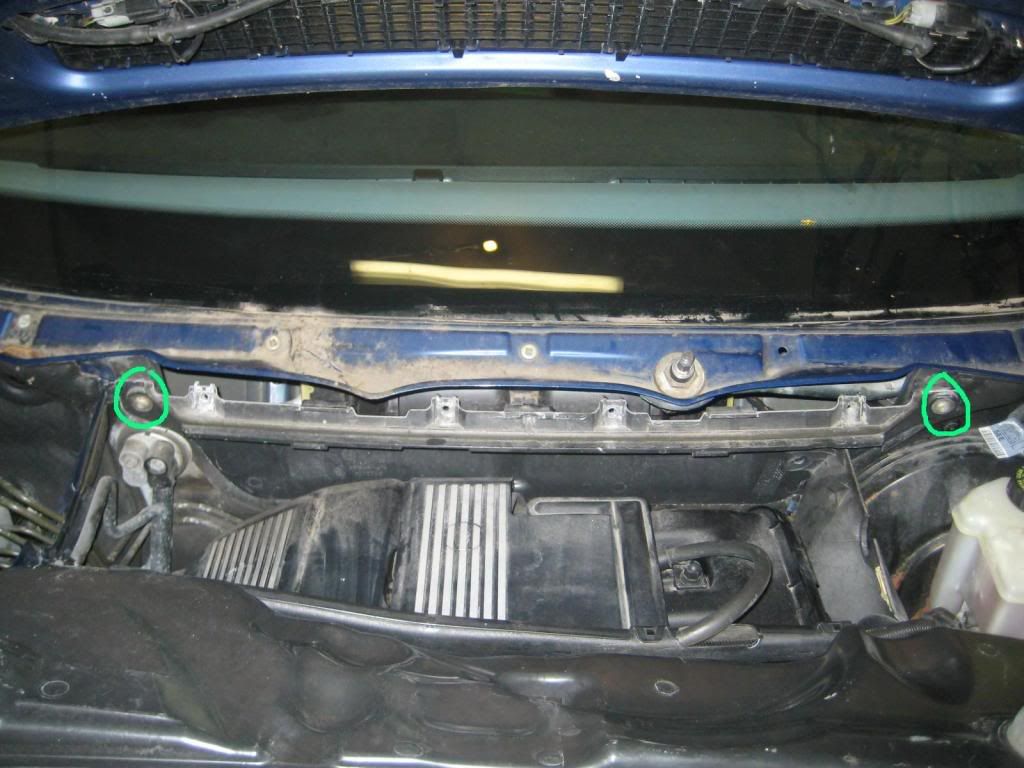
Don’t put the torx driver down yet; you’ll need it to remove the two screws that fasten a panel over the firewall. The screws on my car didn’t remove from the panel, but when they were out of the firewall I pulled up on the panel and it came right out.
![Image]()
This is what you should see. You’ll notice a connection harness circled in pink (no
![Image]()
![Image]()
). These wires connect to the wiper motor.
![Image]()
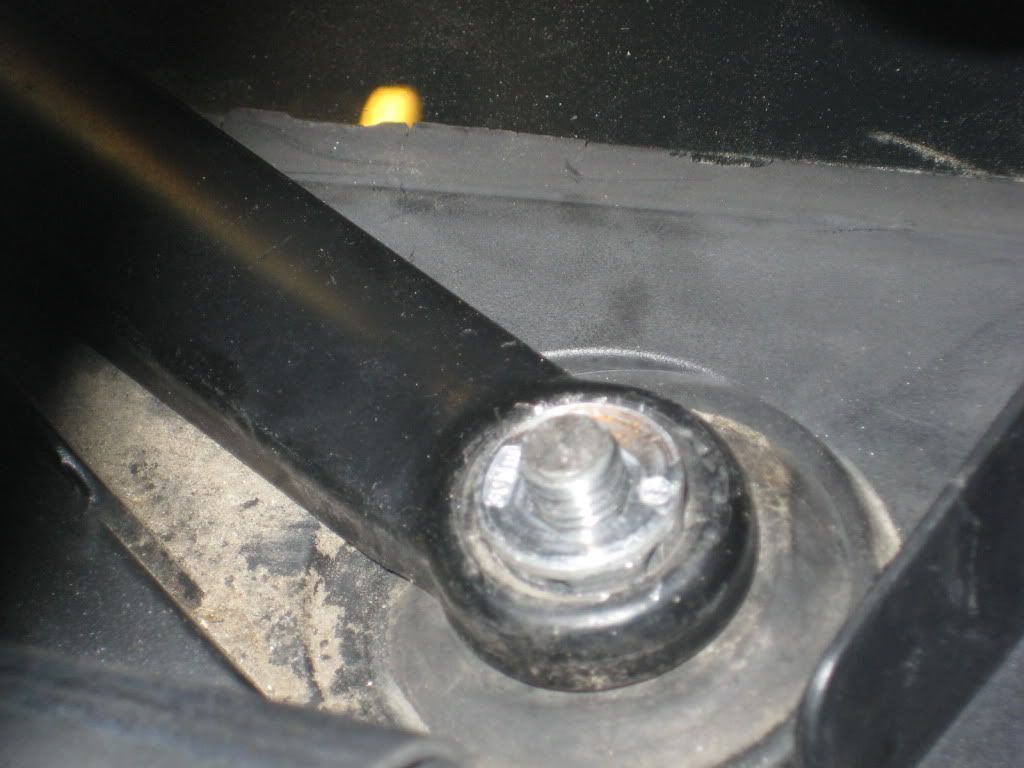
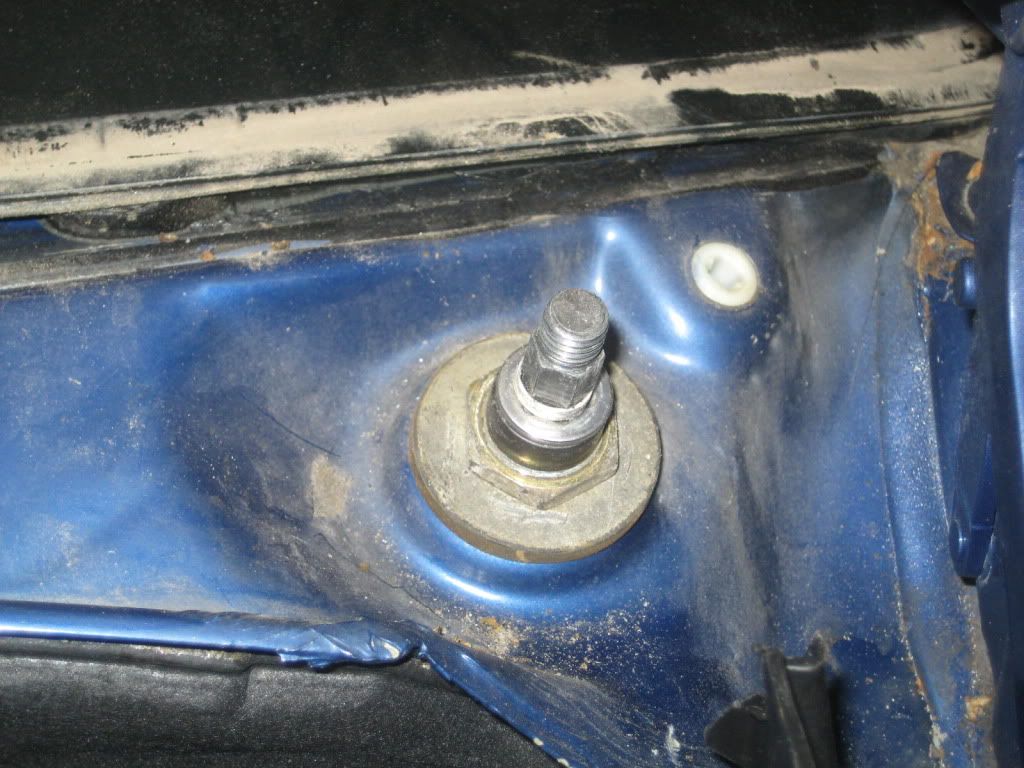
Back to where the wipers connect to the car. Take the 15/16” wrench, ratchet, socket or whatever you are using and remove the nut followed by the washer under it. Do this to both sides, obviously.
![Image]()
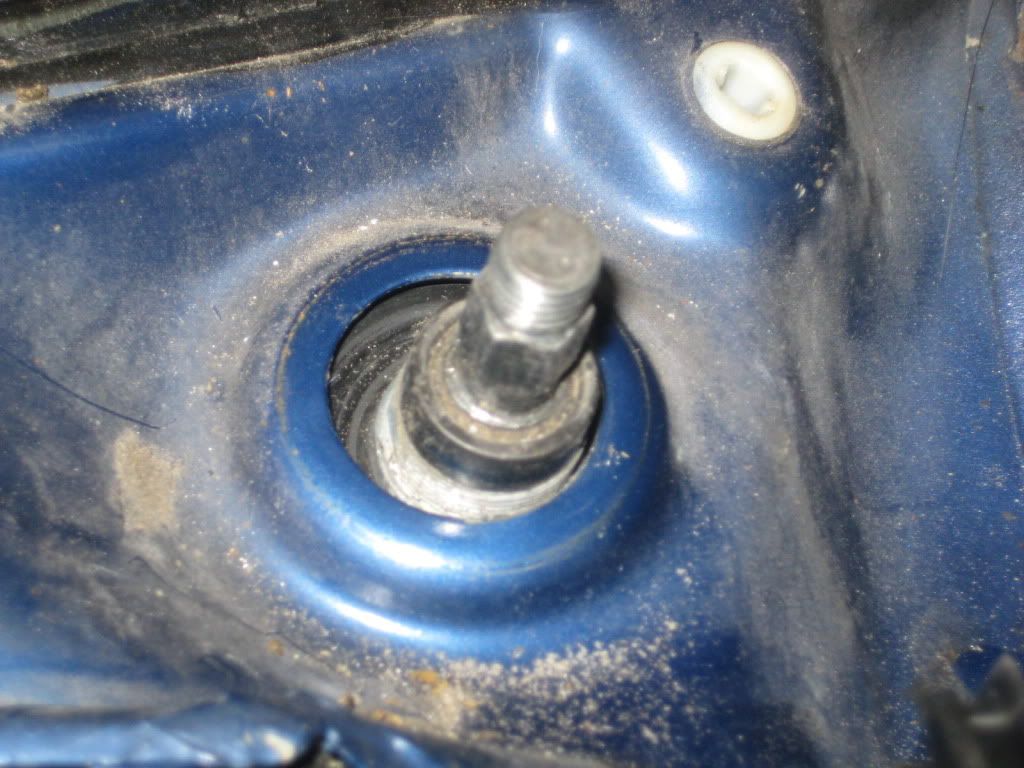
You’ll notice the wiper linkage is loose.
![Image]()
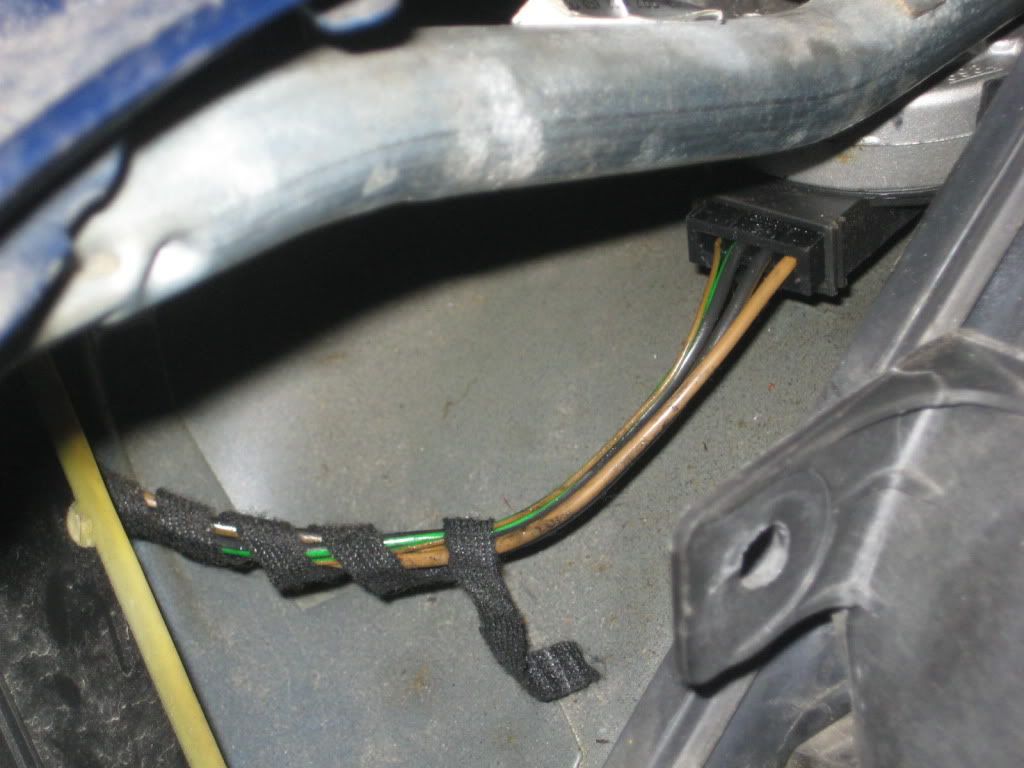
Now you can go ahead and unplug the harness attached to the wiper motor. If you did it earlier then its no big deal, your car won’t explode.
![Image]()
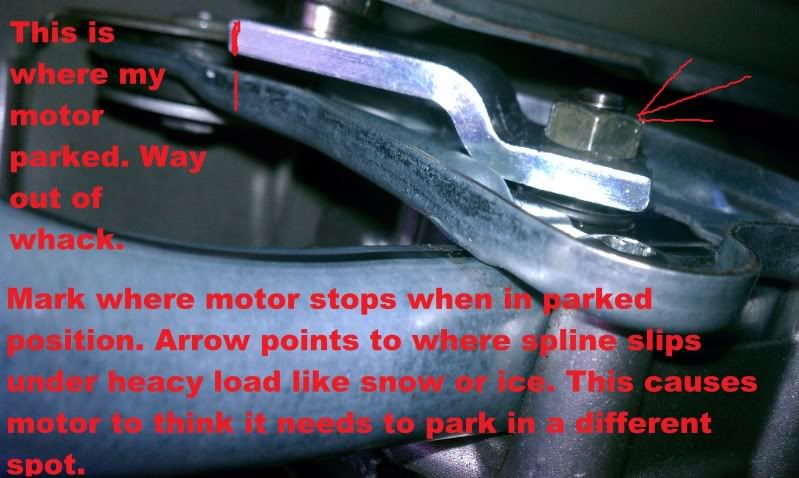
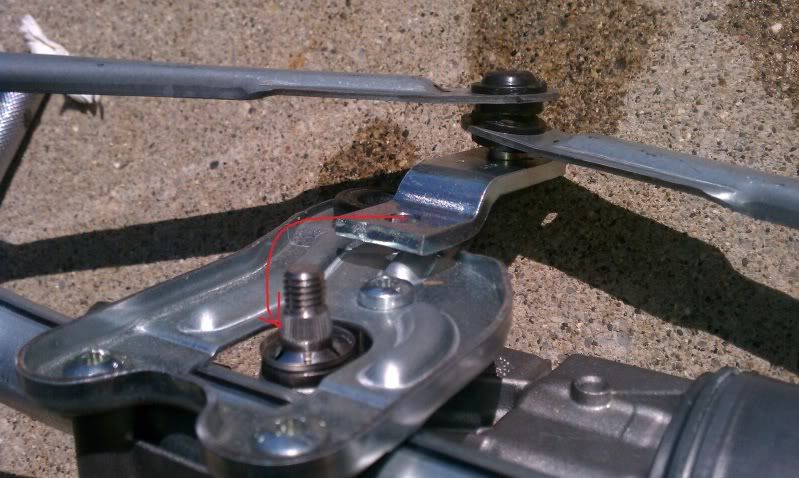
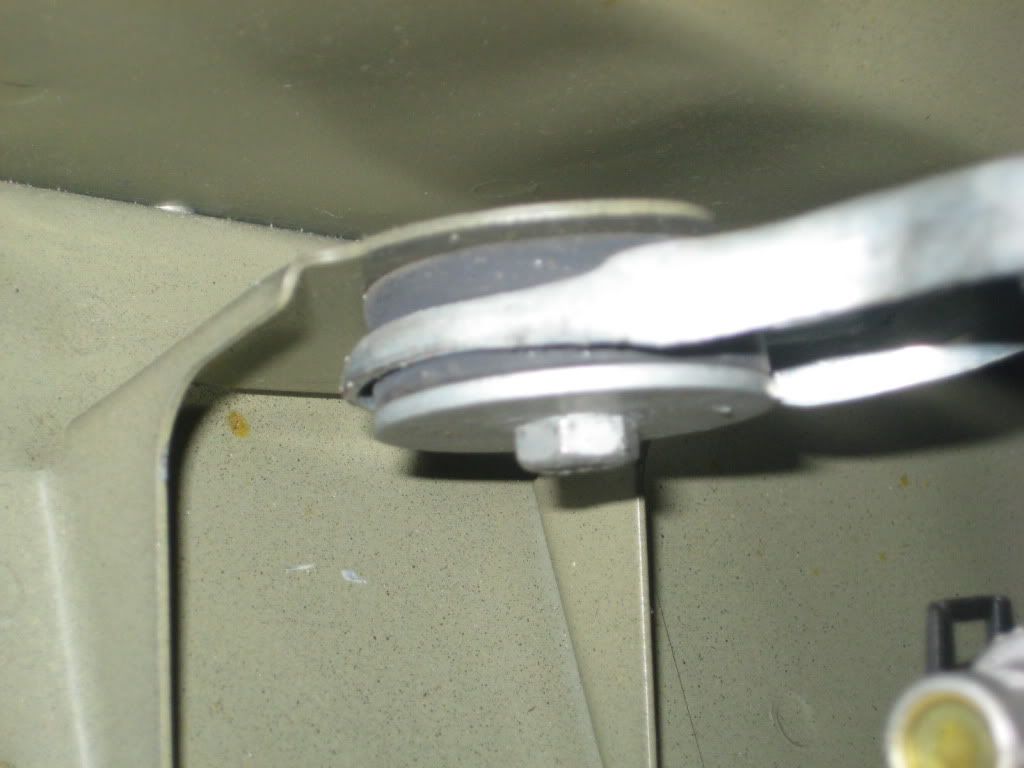
Everything feels real loose and like it’s ready to come out, but you have one more step. There is a 10mm bolt and washer way in there. It’s a pain in the ass, and probably the hardest part of this DIY. You’ll probably need the flashlight to find it. I tried to capture it as best I could in the following image. You can see in the second image down from here where the bolt is located. (Circled in yellow) Once you locate it remove the bolt. Now you can remove the wiper assembly.
![Image]()
You may need to man-handle it out a bit as it’s in there pretty tight.
![Image]()
Here is the assembly out of the car and where the annoying bolt was holding the assembly in place.
![Image]()
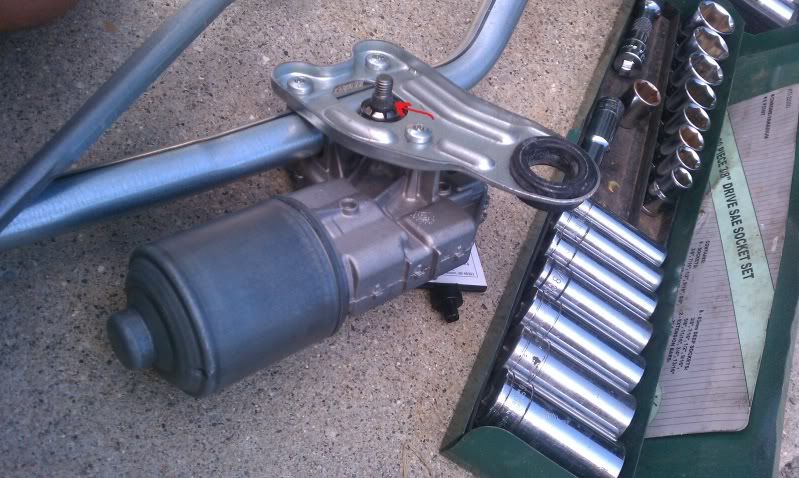
Next, you’ll need to undo the 3 10mm bolts (circled in red) and the one 13mm (blue) to remove the motor from the assembly.
![Image]()
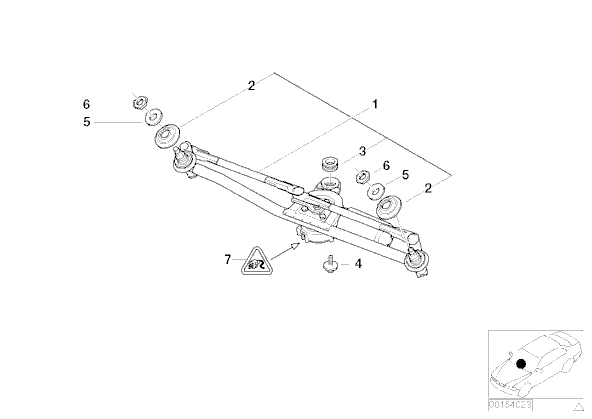
After you do this, you can put the new motor on the assembly and follow the steps backwards to reinstall. When reinstalling the motor I tried to mimic the positioning of the arms in the diagram below taken from realoem.com. This helped ensure that when the wiper arms were attached back to the car they would swing up across the windshield, rather than down towards the engine.
![Image]()
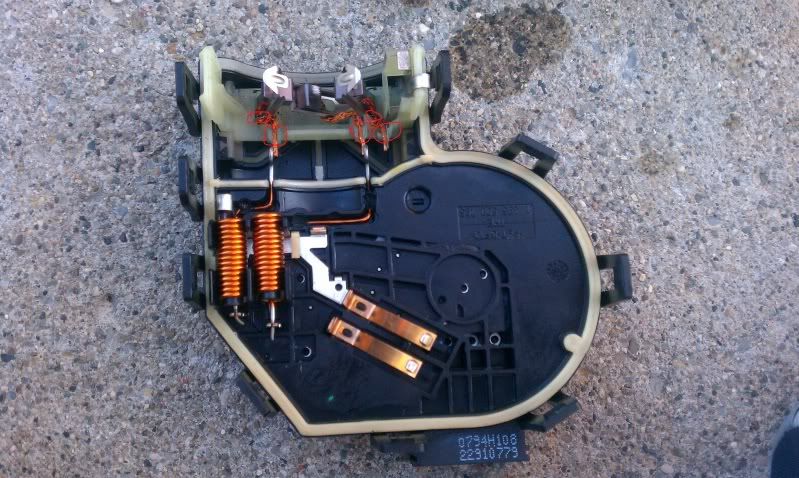
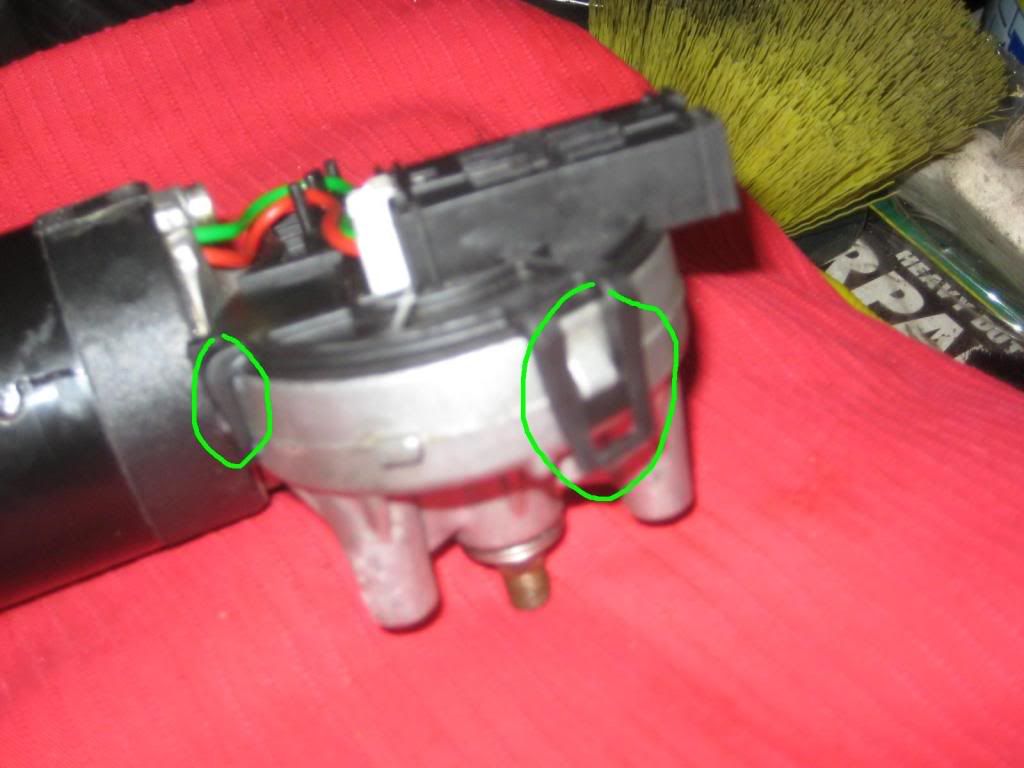
NOTE: After removing my “broken” motor and reinstalling my new motor I came across this posting (post number 3) and a few others. I understood how the motor turned on and off and after a little more research I decided to clean the grease from the disc in the motor. I decided to open up the motor by undoing the 4 clips (circled in green below) and see WTF everyone was talking about.
![Image]()
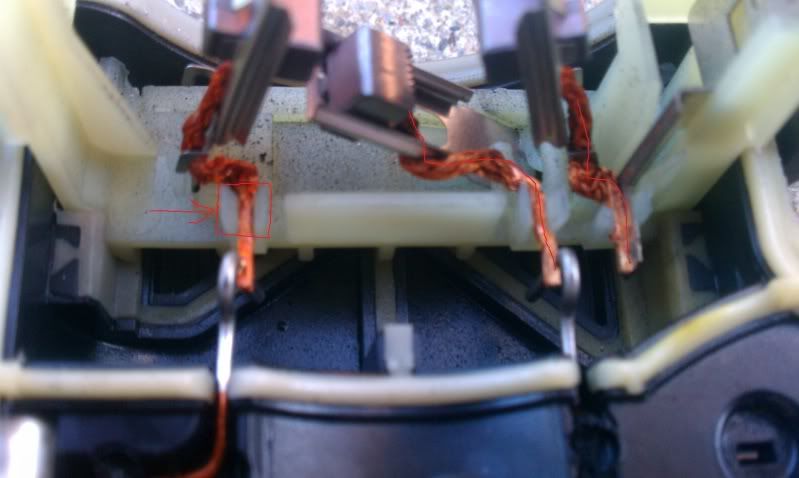
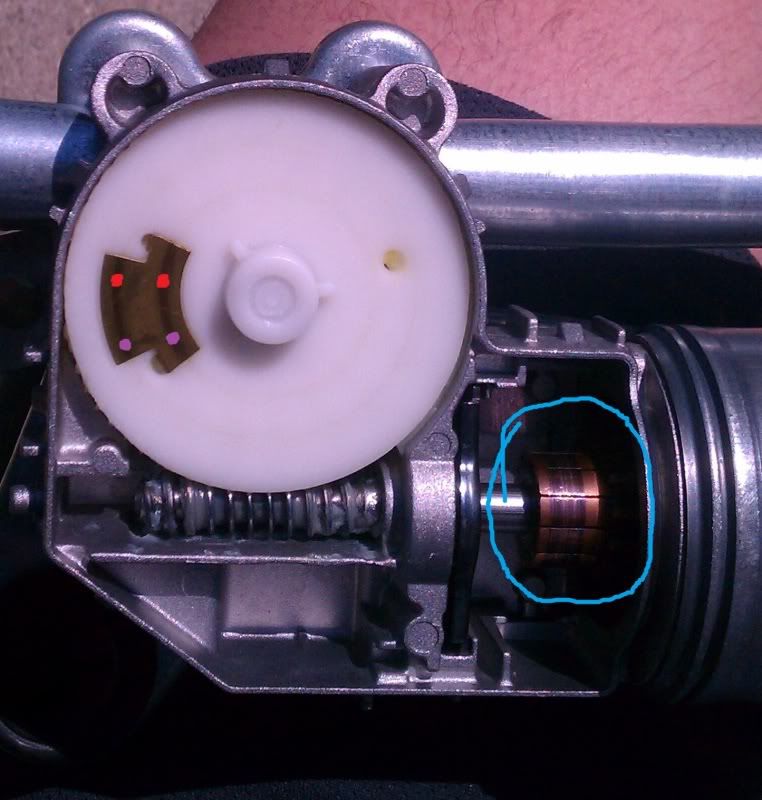
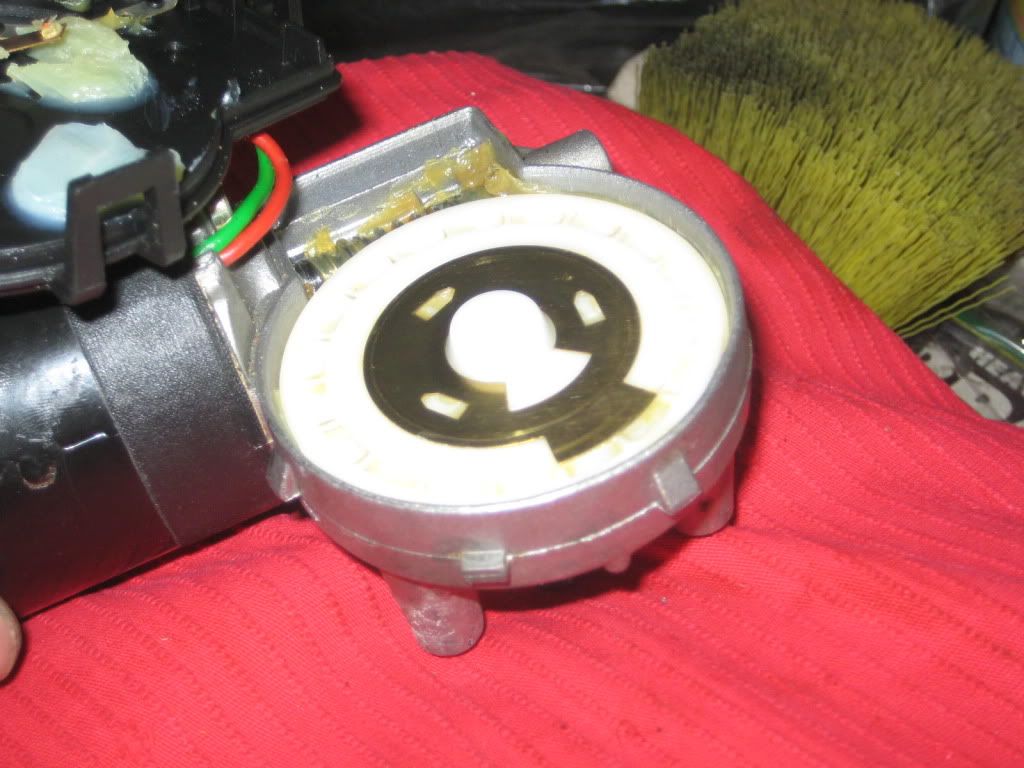
Low and behold the disc inside was covered in grease. I took a rag and wiped all the grease off the disc (first picture below) and the two little brushes (2nd pic below circled in red) that contact the disc. I reassembled the motor, plugged it back into the car to see if it worked, and what do you know, it works like new. So before buying a brand new motor, open your existing motor up and give it a good cleaning and see if that solves your problem. It can also solve the problem of having your wipers stop halfway across your windshield.
![Image]()
![Image]()
GOOD LUCK!
Ok so my wipers stopped working on me and it wasn't any fuses or relays. It had to be the motor. I got another motor and searched everywhere for a DIY and couldn’t find one so I decided I’ll make one while doing the swap.
I am not responsible for anything that you do to your car; this is simply a documentation of how I did it in my car. If you screw something up or your car becomes damaged in any way I am not responsible – you are doing this at your own risk. If you agree than continue reading on.
Tools you will need:
-Flathead screw driver
-Torx 27 bit
-15mm socket
-10m socket
-13mm socket
-Ratchet
-Flashlight
-Adjustable or 15/16” wrench or 15/16” long socket
This took me about half hour to 45 minutes to do.
Start by opening up your hood and locating the windshield wiper arms.

You’ll see a black rubber cap over the pivot point of each wiper. Use the flat head screw driver to remove the rubber cap to expose the 15mm bolt.
Take your socket and ratchet and undo the bolt. You’ll need to wiggle the wiper up and down and back and fourth to loosen the “installation element” (as realoem.com refers to it) out. You can now remove the wiper arm.
Next, undo the 3 rivets that hold the micro filter cover down (circled in red), and remove the micro filter cover. Also remove the wiper cowl, it’s held on by 7 flimsy clips. Just pull on it gently and it’ll snap out.

Next remove the micro filter. (You can use this opportunity to clean out that area and replace the micro filter with a new one when reinstalling)
Now, get your torx 27 bit and remove the 4 screws (circled in blue). After the screws are out you can pull it out of its place and flip it over so it’s laying face down. This way you can avoid taking apart all the wiring connected to the front of the micro filter housing.
Don’t put the torx driver down yet; you’ll need it to remove the two screws that fasten a panel over the firewall. The screws on my car didn’t remove from the panel, but when they were out of the firewall I pulled up on the panel and it came right out.
This is what you should see. You’ll notice a connection harness circled in pink (no


Back to where the wipers connect to the car. Take the 15/16” wrench, ratchet, socket or whatever you are using and remove the nut followed by the washer under it. Do this to both sides, obviously.
You’ll notice the wiper linkage is loose.
Now you can go ahead and unplug the harness attached to the wiper motor. If you did it earlier then its no big deal, your car won’t explode.
Everything feels real loose and like it’s ready to come out, but you have one more step. There is a 10mm bolt and washer way in there. It’s a pain in the ass, and probably the hardest part of this DIY. You’ll probably need the flashlight to find it. I tried to capture it as best I could in the following image. You can see in the second image down from here where the bolt is located. (Circled in yellow) Once you locate it remove the bolt. Now you can remove the wiper assembly.
You may need to man-handle it out a bit as it’s in there pretty tight.

Here is the assembly out of the car and where the annoying bolt was holding the assembly in place.

Next, you’ll need to undo the 3 10mm bolts (circled in red) and the one 13mm (blue) to remove the motor from the assembly.

After you do this, you can put the new motor on the assembly and follow the steps backwards to reinstall. When reinstalling the motor I tried to mimic the positioning of the arms in the diagram below taken from realoem.com. This helped ensure that when the wiper arms were attached back to the car they would swing up across the windshield, rather than down towards the engine.

NOTE: After removing my “broken” motor and reinstalling my new motor I came across this posting (post number 3) and a few others. I understood how the motor turned on and off and after a little more research I decided to clean the grease from the disc in the motor. I decided to open up the motor by undoing the 4 clips (circled in green below) and see WTF everyone was talking about.
Low and behold the disc inside was covered in grease. I took a rag and wiped all the grease off the disc (first picture below) and the two little brushes (2nd pic below circled in red) that contact the disc. I reassembled the motor, plugged it back into the car to see if it worked, and what do you know, it works like new. So before buying a brand new motor, open your existing motor up and give it a good cleaning and see if that solves your problem. It can also solve the problem of having your wipers stop halfway across your windshield.

GOOD LUCK!