E46 Fanatics Forum banner

DIY: M3 front bumper on facelifted e46 sedan

28K views 32 replies 12 participants last post by  PHAHEEM  
#1 ·
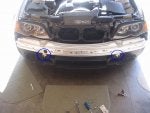
I just finished installing the eBay ABS M3 front bumper (well semi-M3 since it is missing some parts) on my e46 02 facelifted sedan.

You can find info on this bumper by searching the forums. Get it, paint it, then follow these instructions.

I opted to keep my side brackets and use them to mount the bumper. This required a little modification but the goal was to modify only the bumper. I made no changes to the sedan, and no sanding or work on the bumper. The entire procedure took a couple hours, and anyone who can use a spanner can tackle this without problems.

This will be a couple messages so please bear with me :woot:
 
#3 ·
Remove your sedan bumper.

There is one screw and one popout in each wheel well.
Pop those and then move to the front side of the bumper.
Remove the popouts and screws from the underside.
Once you're done, remove the screws which anchor the bumper.
Be sure to PULL THEM OUT.
Once you have those out (they are about 8" in size), you need to unclip the left and right side of the bumper from where it meets the fender at the wheel well. You will need to pull pretty hard. Two clips on each side anchor the bumper.

Thats it. You do not need to remove any more screws.

Next remove the eyelids from under each headlight. Unclip them on the inner side (nearest the center of the vehicle), and pop them out. There are 2-3 clips. Don't be alarmed if it pops right out, its pretty hard to break these suckers.

Removing the eyelids makes it easier to remove the bumper.

Now you can remove the bumper. The trick is to lift it slightly and pull it towards you. Do not pull down - it won't come out.

As the bumper comes out, unplug your left and right fog lights.
 

Attachments

#4 · (Edited)
Remove bumper support bar and re-attach to car.

Remove the bumper support bar from the original sedan bumper. This is quite a pain actually - too many connectors. Anyway no need to post anything here since it is pretty easy to figure out yourself. The only catch is that there are about 8 popins behind the black bumper inserts. Pop those out to remove them (inside of the bumper and mounting holes shown below). Once you have it removed, reattach it to the car and re-insert and tighten the two 8" screws.

We will be attaching the bumper to the support frame after the frame has been attached to the car, and mounting it on directly (vs attaching frame to bumper and then attaching everything to the car. This is because the support bar is a tight fit and the bumper is also missing some anchor points. But this is not a problem!

NOTE you should move the support bar as far back as possible when tightening it to the frame. If you don't, fitment will be slightly more difficult. There is about a 1/4" of space but this makes a huge difference in the ease of mounting.

This step is critical. If you choose to mount the support bar to the bumper and then install it on the car you will not be able to match the fender clips, and you will not be able to screw in the support screws for the bumper (it is too tight).
 

Attachments

#5 · (Edited)
Prepping the bumper.

Ok now to the fun part, prepping the bumper. The M3 replica bumper must be modified in order to fit onto the sedan. This requires cutting on the bumper - but no modification to the sedan mountpoints.

The important thing is we need to create clip-holes for the fender clips, and we need to cut away some of the excess plastic. If you do not cut this away, your fender clip mount will butt up against the bumper corner and you will not be able to mount the bumper.

Some people have taken the approach of removing the fender clips and installing a M3 support bracket. Well, you don't need the bracket because the fit is tight and the bumper rests on the support bar (we will also anchor it). You also want to keep and re-use the fender clip brackets because it will keep the sides of the bumper flush against the car.

This bumper has about a 1/4" lip on each side - using the fender clips eliminates this without modification.

Last but not least, cut away the three mounts brackets shown below (last image). They just don't work (it is impossible to mount them from the inside), and they restrict the bumper from fitting on the existing support bar correctly. We will add drill points to solve this little problem later.
 

Attachments

#6 ·
Modify the inside bracket.

Get out your hot butter knife and make cuts as shown below. Note on the far left that the cut is almost flush but not quite. You want to leave the anchor point in place, otherwise you will lose stability for the bracket. Also take note of the \_| shaped cut. You need to do this to clear the fender clip brackets (see pic below of the first cut which didn't work too well). The rest is cut flush in a straight line.

My first attempt was to leave a lip, and I hoped to use this lip to clip the bumper bracket behind the fender clip brackets. But it didn't work, and the fitment was not aligned correctly. I suggest not doing it. :yikes: Make the full cut so that the two parts have clearance.
 

Attachments

#7 ·
Find the fender clip offsets.

Place some tape over the top, and mark their locations. Also mark the location of a arm that sits roughly half way between the two. This gets in the way (the bumper has a slightly deeper lip than the original, so you need to cut some spacing into it).

Mount the bumper and push the sides in as far as they will go. line the edge with tape where it meets the outside of the clip panel, and mark the clip and arm locations on the tape.
 

Attachments

#8 · (Edited)
Drill holes for the clips.

You can see the original and the new holes below. Take a careful look at the outmost (top) part of the M3 bumper lip. Notice it has been shaven by about 1/4". You need to do this because (as previously noted) the M3 bumper lip is too deep and it won't slide into the fender clip section all the way.

I recommend that you shave the bumper BEFORE you cut the clip holes. It is hard to get the bumper off otherwise.

A dremel will work fine for this (I used a dremel for everything). Keep it at a low speed because this material can catch fire.
 

Attachments

#9 ·
Attach the bumper.

Now the bumper is ready to attach. Slide it on, clip in the sides, and push the plastic flap down (it is behind the main vent area). The fit is tight, but solid. If you did the support clips right they will CLICK into place loudly.

You will find not only does this make the bumper flush with the fenders, but it also aligns it horizontally.

You should have only a slight lip at the center of the bumper where it overlaps on the support bar.
 

Attachments

#10 ·
Review what your bumper is doing.

Right so you have clipped the bumper on. Replace the popins and mounting screws (two behind each wheel well, a few (2 if I recall) under the bumper).

From the diagram below you can see the force distribution. There is a slight flex to the front-end. The screws at the bottom are well held in place because of this. Same goes for the ones in the wheel wells. The plastic flap on the intake will also be pushing up against the grill, adding further force to the front end of the bumper.

So how best to secure this without anything falling out? Simple, drill 3 mount points right below the kidney.
 

Attachments

#11 ·
Final support.

For this you want to close the hood completely, then pull the center part of the bumper a hair towards you (1/8" or so). Mark the area where the hood lines up with the bumper with some tape.

Open the hood, and using some of the popins from the old bumper, drill 3 holes as shown below (remember to pull the bumper slightly towards you when you do this).

Use a drill bit that gives the popins a tight squeeze. When i inserted mine I had to tap the center piece down with a hammer.
 

Attachments

#12 ·
Close the hood and you're done!

The popins will keep the bumper from shifting forwards/backwards, and keep slight tension on the clip-in sides (if you do it right it will make them slightly more flush with the body). Closing the hood keeps the pins down, so the fit is solid and your bumper won't be going anywhere anytime soon. The slight tension is also good for keeping the screws in their brackets under the car and behind the wheel wells. Normally I wouldn't prefer it that way but because this bumper is slightly off by a hair this is my personal preference for install.

Stand back and admire the install. :)
 

Attachments

#22 ·
gsxr mixxer said:
konfoo wanna make some weekend change? if you're located anywhere near sandiego i will pay you to do that to my e46.......
im confident i can do that install. i believe i'll be helping andrew do the same install on his car? :dunno:

might i suggest, konfoo, that the paint step go last in the DIY. you were fortunate enough to get it to fit after having it painted, but painting it last is best so you don't risk scratching up your paint getting it to fit, especially for those not as skilled with custom installs.
 
#23 ·
bro...it was easier just getting the m3 mounting brackets and getting rid of the 4 facelift brackets...this bumper then mounts like it would to an m3... lines are perfect...and it takes only 15-20mins...of course you have to buy all the oem air ducts etc for the m3 bumper but it werks almost perfect...

i think it was cool that you did all that custom stuff...but it seems like a lot of bumps and bruises for no reason:dunno:

see my sig.
 
#24 ·
The M3 brackets would have left a lip on each side where the bumper meets the fender - the bumper is too wide. It seems it is not a perfect replica (there are other things missing from it like the M3 support bar mounting clips on the inside of the bumper, etc). The fog covers barely fit right - I'm sure the brake ducts would not fit without a bit of modification. Plus, I wanted to fit this to the car with minimal modification of anything besides the bumper itself.
 
#25 ·
shogun said:
bro...it was easier just getting the m3 mounting brackets and getting rid of the 4 facelift brackets...this bumper then mounts like it would to an m3... lines are perfect...and it takes only 15-20mins...of course you have to buy all the oem air ducts etc for the m3 bumper but it werks almost perfect...

i think it was cool that you did all that custom stuff...but it seems like a lot of bumps and bruises for no reason:dunno:

see my sig.
this bumper was designed for non-m cars, so getting the m3 mounting brackets would be pointless. maybe the pre-facelift brackets are different than facelift brackets?
 
#26 ·
konfoo said:
The M3 brackets would have left a lip on each side where the bumper meets the fender - the bumper is too wide. It seems it is not a perfect replica (there are other things missing from it like the M3 support bar mounting clips on the inside of the bumper, etc). The fog covers barely fit right - I'm sure the brake ducts would not fit without a bit of modification. Plus, I wanted to fit this to the car with minimal modification of anything besides the bumper itself.

got the same bumper...and thats what i did...here:

maybe i got lucky:dunno:

Image