

My first DIY, so here goes.....
I have broken off my driver side mirror cover. :banghead: For the repair, I use electrical ties.
Please see pic below.
![Image]()
![Image]()
Luckily the FOUR tab are still there, just the hook/clip got broken off.
![Image]()
![Image]()
Now comes the repair: I've drilled small holes first to each tab, then expend them with bigger drill bits.
![Image]()
Here is the tricky part, get the longest electrical tie you can fine but small enough to get it through the holes you drill on the tab. I use these:
![Image]()
Added as of 24-DEC-2010:
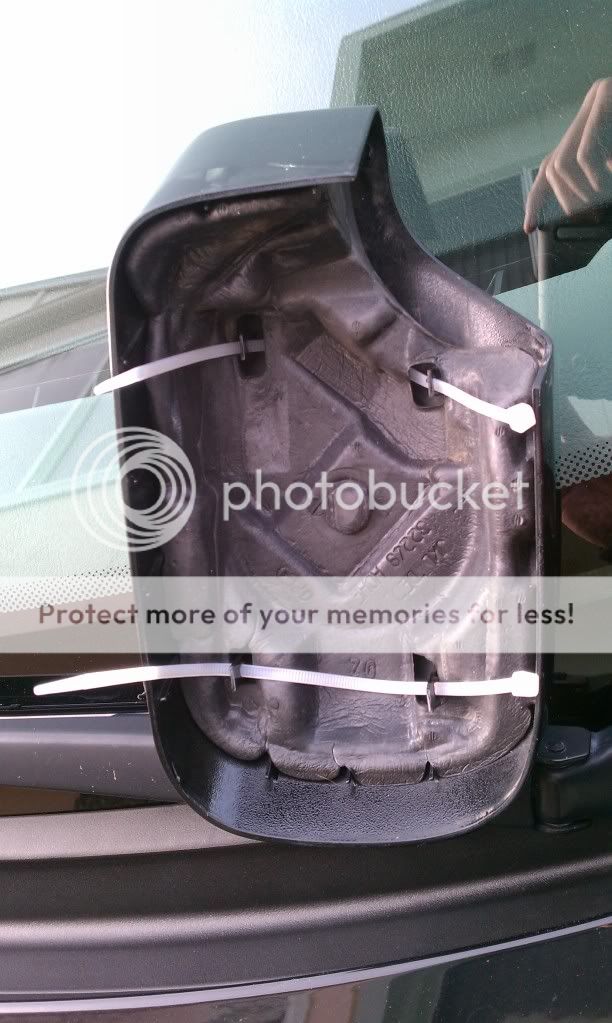
Here is the image where the electrical ties goes. Make sure you put back the installation foam.
![Image]()
![Image]()
This is how I put it back together. DO NOT TIE IT TOO TIGHT, there might be chance where you can snap off the tab.
![Image]()
![Image]()
NOTE: you will only need TWO electrical ties. In the first image you see FOUR square where the clip use to latches on. Place the electrical tie through it and through the holes you drilled; do it vertically.
Edited as of 24-DEC-2010:
The added picture above should provided a clearer picture of how to repair the 'Side View Mirror Cover', and how the electrical tie should go.
EXTRA - for those who wanted 'Carbon Fiber' on their side mirrors, just remove the side cover without the worries breaking off the latches. With the electrical ties, they are much more sturdy.
:thumbup:
<hr><hr><b><font color="yellow" size="2">/</font><font color="red" size="2">/</font><font color="black" size="2">/</font></b> ( @ )( @ )<br>
<center>BMW <b><font color="yellow" size="2">/</font><font color="red" size="2">/</font><font color="black" size="2">/</font></b> 323i <b><font color="yellow" size="2">/</font><font color="red" size="2">/</font><font color="black" size="2">/</font></b> Sedan</font><br /></center>
<div align="center"><img src="http://i790.photobucket.com/albums/yy188/sellsellsell2000/e46test.jpg" border="0" alt="" /><br />
<font size="1">OEM M-Tech II front & rear bumper <b><font color="yellow" size="2">/</font><font color="red" size="2">/</font><font color="black" size="2">/</font></b> Cluster Ring <b><font color="yellow" size="2">/</font><font color="red" size="2">/</font><font color="black" size="2">/</font></b> Grimace Fog Lights <b><font color="yellow" size="2">/</font><font color="red" size="2">/</font><font color="black" size="2">/</font></b> DEPO corners <b><font color="yellow" size="2">/</font><font color="red" size="2">/</font><font color="black" size="2">/</font></b> CCFL angel eye <br/>
330i Diff <b><font color="yellow" size="2">/</font><font color="red" size="2">/</font><font color="black" size="2">/</font></b> REMUS Exhaust <b><font color="yellow" size="2">/</font><font color="red" size="2">/</font><font color="black" size="2">/</font></b> Heat Shield Cold Air Intake</font><br/>
<hr><hr>
</div>
I have broken off my driver side mirror cover. :banghead: For the repair, I use electrical ties.
Please see pic below.


Luckily the FOUR tab are still there, just the hook/clip got broken off.


Now comes the repair: I've drilled small holes first to each tab, then expend them with bigger drill bits.

Here is the tricky part, get the longest electrical tie you can fine but small enough to get it through the holes you drill on the tab. I use these:

Added as of 24-DEC-2010:
Here is the image where the electrical ties goes. Make sure you put back the installation foam.

This is how I put it back together. DO NOT TIE IT TOO TIGHT, there might be chance where you can snap off the tab.


NOTE: you will only need TWO electrical ties. In the first image you see FOUR square where the clip use to latches on. Place the electrical tie through it and through the holes you drilled; do it vertically.
Edited as of 24-DEC-2010:
The added picture above should provided a clearer picture of how to repair the 'Side View Mirror Cover', and how the electrical tie should go.
EXTRA - for those who wanted 'Carbon Fiber' on their side mirrors, just remove the side cover without the worries breaking off the latches. With the electrical ties, they are much more sturdy.
:thumbup:
<hr><hr><b><font color="yellow" size="2">/</font><font color="red" size="2">/</font><font color="black" size="2">/</font></b> ( @ )( @ )<br>
<center>BMW <b><font color="yellow" size="2">/</font><font color="red" size="2">/</font><font color="black" size="2">/</font></b> 323i <b><font color="yellow" size="2">/</font><font color="red" size="2">/</font><font color="black" size="2">/</font></b> Sedan</font><br /></center>
<div align="center"><img src="http://i790.photobucket.com/albums/yy188/sellsellsell2000/e46test.jpg" border="0" alt="" /><br />
<font size="1">OEM M-Tech II front & rear bumper <b><font color="yellow" size="2">/</font><font color="red" size="2">/</font><font color="black" size="2">/</font></b> Cluster Ring <b><font color="yellow" size="2">/</font><font color="red" size="2">/</font><font color="black" size="2">/</font></b> Grimace Fog Lights <b><font color="yellow" size="2">/</font><font color="red" size="2">/</font><font color="black" size="2">/</font></b> DEPO corners <b><font color="yellow" size="2">/</font><font color="red" size="2">/</font><font color="black" size="2">/</font></b> CCFL angel eye <br/>
330i Diff <b><font color="yellow" size="2">/</font><font color="red" size="2">/</font><font color="black" size="2">/</font></b> REMUS Exhaust <b><font color="yellow" size="2">/</font><font color="red" size="2">/</font><font color="black" size="2">/</font></b> Heat Shield Cold Air Intake</font><br/>
<hr><hr>
</div>


