E46 Fanatics Forum banner

Control arm diy - Cannot remove inner ball joint

1 reading
39K views 59 replies 26 participants last post by  Dave1027  
#1 ·
Hi fanatics,

Started removing the control arms on my 260 000 KM car (+- 160 k Mi) and got almost everything removed, but I cannot for the life of me get those DAMN inner ball joints removed!!

I tried banging the **** out of them with a hammer and pickle fork from different angles, banging on them from the top with a hammer and long breaker bar... seems like they won't budge. The outer ones were fine using a ball joint separator (which I GREATLY recommend if you're going to do this job btw), but the inners are not moving.:banghead:

Is there a tool or trick that people around here can share in order to make things a little easier ?
The puller I have will not fit in there. Starting to run out of ideas here... Don't want to admit failure yet and take this thing to a mechanic

Thanks in advance if anyone has any ideas
 
#4 ·
Maybe you can release the nut from the engine bay with a large exention and a air ratchet. I had the problem that the nut of the inner baljoint was stuck and and the balljoint was spinning.
finaly I lowered the subframe a bit and cut the nut of with a grinder. If you had a small air grinder you dont have to lower you subframe.
 
#5 ·
I just did mine a couple of weeks ago. The inner joints were a bear. I used a ball joint separator (pickle fork), a 3lb mini sledge and some muscle. I placed the BJS in line with the side of the caliper, basically from the front and hit towards the back or lined up from the front of the car to the back. Just keep banging on it with the sledge, it will take quite a few good whacks until it pops off.

When I tried it from any other angle I would be hitting the back of the caliper area and could not get enough drive to release the ball joint.

<---front of car BJS---> O ball joint ---->rear of car

Sorry about the crappy diagram.
 
#7 ·
I regret to tell you that you're not the first to come to the conclusion that there must be some easier way that you're not privvy to; this question gets asked a lot. Unfortunately, such easier way does not exist. If you know a friendly shop, they might take a few bucks to put it on the lift and take a few whacks at it with a sledge to get the ball joints free for you***8212;then you can bolt it back together to get it home where you can finish the job.

To be candid, my control arms were about ten years old when I replaced them, and I never did get the ball joints to come loose. I threw in the towel and had a shop do it. (I got some peace from the story about how the first guy assigned to the job couldn't get them free, either.)

Good luck.
 
#15 · (Edited)
I regret to tell you that you're not the first to come to the conclusion that there must be some easier way that you're not privvy to; this question gets asked a lot. Unfortunately, such easier way does not exist. If you know a friendly shop, they might take a few bucks to put it on the lift and take a few whacks at it with a sledge to get the ball joints free for you-then you can bolt it back together to get it home where you can finish the job.

To be candid, my control arms were about ten years old when I replaced them, and I never did get the ball joints to come loose. I threw in the towel and had a shop do it. (I got some peace from the story about how the first guy assigned to the job couldn't get them free, either.)

Good luck.
OP, Kroh, and all others:

First, OP, glad you were able to complete the job.

But, THERE IS A MUCH EASIER WAY TO REMOVE/INSTALL THE INNER BALL JOINTS OF THE FRONT CONTROL ARMS.

I have done this myself! No pickle forks. No mauling of your front cross brace. No prying against parts that aren't designed to be pryed against! No cussing. No cut up or bruised hands. No meltdown!

The pictures are worth 1,000 words. Done this way, let me just say, the job is really easy. Really, really easy.

Questions?

Scott
 

Attachments

#9 ·
Thanks for the input and encouragement guys!

I had all the nuts but the passenger side inner one removed when I wrote the first post. My problem was more getting the inner ball joint loose with the pickle fork after the nut is off.

It seems that even though I read through the entire DIY thread about control arms, I still thought I could separate them without using a sledge (using the hammer I have at home). Since that didn't work, I went out and bought a short 4 lb sledge which, after the first good wack, freed the control arm from the subframe. All about the right tools for the job. So drivers' side is done... still have the passenger side inner nut to remove and that will be pretty much done as well.

Anyways, just wanted to thank you guys again for the input, and I'll be finishing the job tomorrow night after work when I buy a 21mm combo wrench to free that damn passenger side nut.
 
#11 ·
Don't forget when installing to put a jack under the ball joints to prevent them from spinng.
This is a good point. Also, be careful when taking off the passenger side nut. When i did my CAs a couple of weeks ago I had an issue with the drivers side inner ball joint. I had the nut about 90% off and the bj started spinning with the nut. Apparently there is an allen-head on the top of the ball-joint but mine must've been stripped or something. I slept on it and got it off the next morning with some improvisation. Here's my original thread and its got some good info just incase this happens with your passenger side. http://forum.e46fanatics.com/showthread.php?t=912938&highlight= If your balljoint does start spinning don't try to cut it off below the subframe and push it through the top. It won't go because there is a taper. This is why forzam's quote above is good practice.

Sorry, Im not trying to scare you I just want to help prepare you just in case you get hung up on the other side. In my case it took ~1.5 hours for passenger side and ~1.5 days for drivers side!

Oh and great job getting the stuck BJ out. We knew you could do it. Sometimes it just takes some sleep, a beer, and ALOT of swearing.

Let us know how you make out!
 
#12 ·
Once again, MANY THANKS for the input and encouragement! It definitely had a big role in motivating me to move forward with finishing this job

I removed both old control arms yesterday. The passenger one took only two good whacks with the 4lb sledge. Have one of the new ones in, but I ripped one of the week old FCAB trying to get it off the old control arm with my 3 jaw puller... FML!!

I'll pass by the dealer to get a new one tonight and finish the job then. Thank god I have another vehicle to use to get to and from work.
 
#30 ·
MJ, Stinger, Jules, Mango, and others:

First, thanks for the kind comments. FYI, my special ordered and bought new by me 330 has never been driven in rain nor has it spent a single night parked outside. I was fortunate to retire at 52 (with no pension) and I have alot more time than you folks who still work. The only thing is that, now at 59, the concrete floor seems to be getting more and more uncomfortable than it was in years past! Don't laugh, it'll happen to you too one day!

Related comment, P21S Total Body Wash is one of my most essential detailing products. Many cleaners dull bare aluminum and/or painted surfaces. P21S TBW does not but still cleans better than any other product I've used previously.

Now, control arms:

1) I checked my maintenance log for the receipt for the engine support and must have tossed it. I don't remember where I bought it, but it is a super heavy duty one. It must weigh 50 or 60 pounds. However, I do remember that it wasn't that expensive. Understand too, it is a universal one and not BMW specific.

2) With all due respect, it is my opinion that pickle forks are less than ideal, primitive tools. Pickle forks are more suitable for use on primitive vehicles, not on finely engineered BMWs.

3) The subframe on your E46 is formed sheet metal and welded together in sections, with tapered sleeves inside the structure. Even with a small capenter's hammer you could beat the subframe into an unrecognizable piece. As a consequence, a pickle fork will deform the subframe, especially around the tapered sleeves. This is not a good thing.

4) There are more suitable uses for pickle forks, like removing ball joints from a FORGED piece such as your outer front suspension carrier. Personally, I still wouldn't use a pickle fork on this either, and prefer the pivot style ball joint removers (the one you tighten a bolt to release the ball joint).

5) In my 9 years on this forum, and in my 46 years of turning wrenches on cars, there are many variables in what can make a job difficult. I have seen countless threads on this forum where people describe problems removing the inner ball joints. But then, some people seem to have only minor hassles. There is a reason for this.

6) How difficult your ball joints are to remove is dependent on three key factors; 1) the age of the car and whether or not corrosion is present, 2) whether or not the ball joints where over torqued and/or had their tapers lubes (NEVER lube the taper!), 3) one's mechanical skills and/or simple luck.

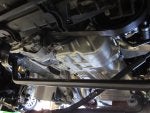
7) Removing the subframe provides an IDEAL opportunity to perform other maintenance items. Want to replace your engine mounts? With the subframe out of the car the most difficult part of this is removing the air cleaner box so you can get to the left side, upper engine mount bolt. Piece of cake! Want to pull you oil pan to inspect things, safety wire your oil pump nut, and/or install the an oil pan windage tray? Easy! How about installing the Turner engine mount/subframe reinforcement kit? All you need is someone to weld it up and you're done. Awesome! Or, you can make a thorough inspection of this area - a really thorough inspection - and while you're at it clean things up with some P21S and hot water and you'll make things look like they're brand new. Well, maybe only for you OCD folks like me....:rolleyes:

8) Perhaps most importantly, after 46 years of turning wrenches on my cars there is NOTHING MORE DISTURBING than having a meltdown due to difficulties with the job. In years past, I sometimes cussed words that weren't even words and at times thought I was going to keel over and die. That is a MISERABLE feeling and, as we all know, you don't do your best work when you're in this state of mind! So, just be prepared, get the proper tools, have a plan, and most importantly, make sure you have ENOUGH TIME to do the job.

I think this covers everything. Any other questions? I am here in a sincere attempt to help.

Scott

PS MJ, hope you're feeling better.
 
#31 · (Edited)
Stinger, The only thing is that, now at 59, the concrete floor seems to be getting more and more uncomfortable than it was in years past! Don't laugh, it'll happen to you too one day!
I was just browsing at Sears last night as they invent new things that I never heard of before. Just discovered a 'wobbly' socket tip on a bavauto youtube, and I picked one up. Amazing what I never had before that I need now!

Anyway, your knees on the concrete; I saw two varieties of cushioning pads at Sears. They sell like 2' X 2' interlocking squares that you fit together on the floor to give some cushion instead of pushing your bones into concrete. You can get 24 sq ft total of the stuff for $20. I'll try it next job. On sale at Harbor Freight now for only $9.99

As for undercar clean, it is interesting the diff levels of purity. I never drive in snow so I get no salt ever. I do drive cross country so I naturally see lots of rain and park outside in motel parking lots.
I was just under my car and for an eight year old car, the salt really makes the difference. So much is so clean compared to every other car I've ever had that I drove thru snow. Even without your meticulous care, I have faith that rust or corrosion will not be what eventually takes my car out.
 
#33 ·
Hey guys, just wanted to report that all parts are back on the car, I went out for a test drive yesterday and she feels amazing!! Super glad I did this job, despite all the hurdles (which I view as learning experiences more than anything else)... If I had to do this job again, I'd make sure I use SLO Town's method just because of that passenger side inner ball joint nut.

I also wanted to thank everyone who came in here and took time to encourage/share ideas/methods, etc. because it really did help alot. This is why I love this site! Now off to do a little driving!

Cheers!
 
#40 ·
I'm hearing a "click" from the right-front wheel when I hit the brakes. I'm also picking up a shimmy/vibration at highway speeds. I thought it might be a tire out of balance, so I rotated the tires and the location of the vibration (front end) hasn't changed. Also, I drove the car over one of those steel-deck drawbridges and the car wouldn't track straight... it weaved erratically from side to side in the lane, steering wheel was useless. So, I'm 99% sure that I have either a bad/worn control arm bushing or a bad inner ball joint (or both). So, this weekend I plan to replace all of the lower control arm components.... new bushing, new inner ball joint, and new control arm (and outer ball joint). The car has 124,000 miles on it so it's probably long overdue for this. Going to do both sides then have it aligned. I own the XI, so that video that I posted earlier is what I'll be following. Wish me luck!
 
#50 · (Edited)
Do not support the engine with the oil pan.

You stand a chance of distorting the pan, cracking the pan, stressing the lip at the gasket enough to start a leak, or disturbing something attached to the inside bottom of the pan.

Take a shot if you want to take the risk. Do you know the engine brace is on sale regularly at Harbor Freight for about $60? Is that the amount of money you're trying to save?