E46 Fanatics Forum banner

E46 M3 Diff Bushings DIY (Powerflex Poly) picture install thread

56K views 64 replies 14 participants last post by  aa240sx  
#1 · (Edited)
I couldn't find a well-documented DIY thread specific to the E46 M3 diff bushings diy so I'm putting one together for the world. I also may skip over obvious stuff like removing trim or the splash guard up front etc. This isn't for the mechanically weak but it isn't as bad as doing the engine rod bearings or the rear main seal and clutch on an SMG car like mine.

*Tq specs for bolts are not necessarily listed as there have been different size bolts over the years and if a bolt was ever replaced with something not oem, either harder or not as hard, that changes things too. Please consult the internet for appropriate tq spec for your bolts. Not the 8.8 or 10.9 on the head as they are important along with the size of the bolt which usually can be found on www.realoem.com for your production year vehicle.

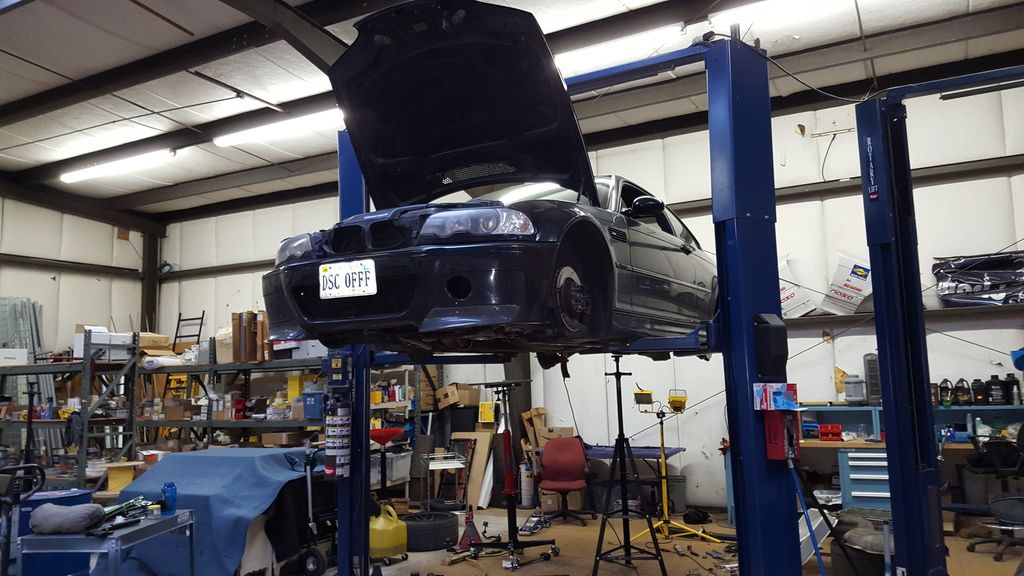
I'm sure you can do this on jack stands but like all jobs I prefer a lift.


I did all the work solo (except for getting the diff back on the transmission jack, had a friend handy so why not!) but I'd say a second pair of hands would certainly speed things up.

Tools required/recommended:
A. Full set of short and long 3/8 inch drive metric sockets up to 24mm and a 3/8 ratchet as well as a few short and long extensions. B. Full set of short ½ inch drive metric sockets up to 24mm with ½ ratchet and short/long extensions. C. Full set metric wrenches up to 24mm (ratchet preferably but a combo will do). D. Rubber mallet. E. Big Ass Hammer (small may work too). F. Sawzaw with metal cutting blades. G. Drill with multiple drill bits (you'll likely break a few). H. Skillsaw with extra blades. I. Pry bar. J. Flash light. K. Transmission jack. L. Large adjustable height jack stands that are like 6' tall but adjustable every 10" in height with a screw top to change height. M. Torque wrench. N. (hopefully not needed) Tap and Die set up to M14x1.5. O. ¼ inch drive ratchet with various extensions for 8mm, 10mm, and 13mm. P. Big (8") C-clamp. Q. Full set of female Torx Bits for ratchet drive. R. BMW diff bushings tool S. Second vehicle to make tool, parts, and food runs and return to the car over night (possibly multiple nights). T. Camera (phone is fine to review placement of bolts/things. U. Brake clean for degreasing. V. Box of disposable gloves. W. Orange clean for washing up. X. Beer. Y. A sound system to play and hone awesome Pandora stations (I recommend Rick Ross). Z. Z-German Car you're working on. Sorry had to get to Z-Germans.

1. Get car in the air, in Neutral. Remove the rear wheels. If you have converted to wheel studs congrats that will come in handy later.


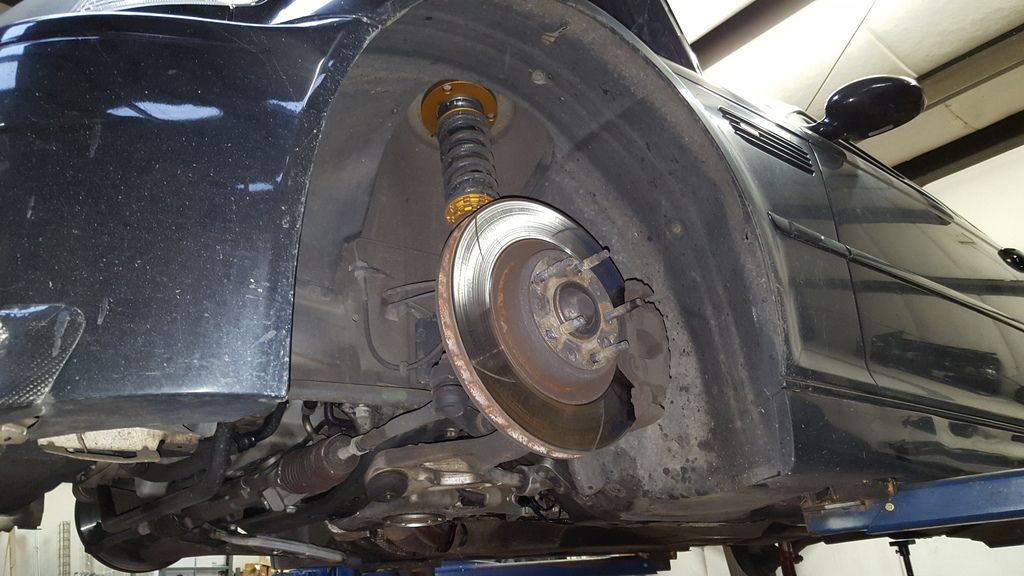
If you haven't, I highly recommend it, but put back in 3 bolts each side (at least a few turns), any 3 with at least one not in a row because you'll need leverage later to counter the tq to unscrew the axles as well as re-torque the axles.
 
#2 · (Edited)
2. Remove the black rear brace (13mm on the sides 16mm idle bolt) that anchors in the center of the subframe and over by the rear jack points.


3. Drop the middle 2 sections of exhaust. You do not need to drop the muffler to do this. Take off the 4 bolts at the headers (torx bits with a wrench on the other side). Leave the two black cross members underneath the second section for now. Take off the back 6 bolts of at the back of the first set of pipes (13mm on one side, 12mm on the other) I found it most efficient to use a 1/4 drive ratchet with 13mm socket and a 12mm wrench to accomplish this. Remove the rear black cross member under the forward end of the second section, the one that has the two bolts in the middle that the exhaust hangers attach to (all 6 are 13mm). Then go to the muffler and remove those 4 bolts from the rear of the second section (torx bit and 14mm open wrench on the muffler side). Because you left the front black cross brace that allows you to separate from the muffler and lower gracefully.


4. Remove the second cross brace (13mm). Now the exhaust is off. Time for the drive shaft.

5. Remove the ***8220;wrinkly aluminum heat shield***8221; that blocks the driveshaft from the exhaust. 4 (10mm) screws.
 
#3 · (Edited)
6. Remove the front bolt/nut combo off the guibo on the back of the transmission. Should be 19mm on one side and 18mm on the other. Using a ratchet on the bolt with a wrench on the nut is the easiest way to do this. You can easily rotate the guibo/driver shaft putting a wrench on the one you want to target next and attack the nut from the passenger side with the wrench. After all 3 are gone from the driveshaft side go ahead and remove the 2 (13mm) washer-thingies on the center-support shaft bearing. You'll want to support the drive shaft to not bend the aluminum brace holding the cssb as you remove the bracket off the chassis.


7. Final removal of the driveshaft: Now that the front of the drive shaft is removed bungee cord or zip tie it to the transmission cross brace to support it, you're about to remove the rear, don't want to drop it! Or that's where your friend comes in to hold it. I used a transmission jack to be prepared to handle the fall of the drive shaft in addition to the bungee up front, it saved my drive shaft from dropping. Remove the 6 torx bits from the diff at the rear of the drive shaft. It won't fall off, or at least if appears to, you're good, just take it off. But since it probably won't, rotate the drive shaft until you see the grove, there's only one. Use a flathead or skinny prybar to start separating it from the diff. It will FLY OFF when it separates, unless your friend can help gently pull as you pry. Anyway, not that's off!


8. On the driver-side front subframe brace there's 2 (10mm) bolts to remove a small cover, take that off.

 
#4 · (Edited)
9. On the passenger side, take off the big plastic cover that covers part of the subframe/diff on that side. It will be 8mm bolts.


10. Drop the rear sway bar. Top bolts at in the perch that holds the rear springs are 17mm, I used a ratchet, the bottom are 13mm, also used a ratchet. Take those 2 bolts off both sides. Then remove the 4 allen wrench bits that hold the bushings on the sway bar to the subframe. You won***8217;t be able to remove it completely until you remove one of the axles (which you will need to do anyway).


#5 · (Edited)
11. Remove an axle from the diff (6 torx bolts each side). Use a non-abrasive material against your wheel studs/lug nuts (you don***8217;t want metal to mangle your threads) like the plastic handle of a long pry bar or of a long screw driver handle to counter the rotation of your ratchet with the appropriate torx bit on the shaft bolts. With some pulling and wiggling you should be able to drop the shaft out of the diff. Note the metal/color difference where the axle separates from the diff so you know what to wiggle or pry on vs not. I just tapped it with a rubber mallet and it broker free, probably no need to actually pry*


#6 · (Edited)
12. You should be able to wrangle out the whole sway bar assembly at this point. If you can***8217;t for some reason, repeat step 10 and remove/drop the other axle out of the diff and that should do it.

13. Support the subframe with a jack of some kind (I'm not sure it's necessary but better safe than screwed with bent subframe bolts or something) to drop the front subframe reinforcement brace that goes under the front of the diff and attaches to the 2 front subframe bolts (18mm?) and there are 4 13mm bolts up in it, 2 per side.

 
#7 · (Edited)
14. Now the diff accessible and is only attached to the subframe by one front bolt accessed from the passenger side on the side at the front of the subframe (21mm) and the two rear bolts at the top of the diff on the cover (Big torx bits). I used a transmission jack to get flush with the rear cover of the diff in preparation for dropping it. You could use your friend for this too, but it might suck to hold the diff for that long...


15. You'll want to support the diff at all times while you remove the 3 bolts so you don't damage any threads (like I did...). For the front bolt it's a 21mm socket, for the rear it's a torx bit to break them loose, but you'll quickly back the ratchet into the body of the car and not be able to go far enough to take the bolt out or even get the ratchet off the bolt, resulting in screwing the bolts almost all the way back in to get the ratchet off. Once you have the 2 rear torx head bolts broken loose and you can remove the ratchet, use an 11mm (12 tooth) wrench to remove them (BUT DO NOT TRY TO BREAK THEM LOOSE WITH THE 11MM WRENCH you will likely strip them and be screwed). I had a ratchet wrench set so that made quick work of that. A standard 11mm (12 tooth) will work too it will just take longer.


16. While still supporting the diff at the back, see if you can support the front of the diff either by a pry bar or a jack of some kind to take stress off the front bolt using a 21mm ratchet. It's a 65mm long bolt so it will take a while, be patient. Once that's out the diff will be free to be removed. The front will rest in the subframe and you will remove it out the rear of the subframe. I lowered the transmission jack I was using to support the rear of the diff and carefully backed out the diff until the top of the back was clear of the body and the front was clear of the subframe. Now it's out! Time for bushings...
 
#8 · (Edited)
17. It***8217;s a heavy piece of equipment, the diff. I could handle it safely to the ground, which is where I suggest you change the bushings, and a second set of hands is helpful to do so (also to move it back up onto the transmission jack or if the two of you are all HULK back up into the subframe later.
Screw special tools or burning the bushings out with a torch. Take a drill with a drill bit and just drill away oem bushing material all the way around each bushing. Drill all the way thru the bushing and move one drill bit size away and repeat until you get all the way around. I used a skill saw too and then worked a blade thru and cut all the way around 360 degrees after drilling. Then I used a big socket and a hammer to knock out the middle of the bushing.


#9 · (Edited)
18. There will be a small metal ring still in there that needs to be removed. Take a reciprocating saw with metal blade and make a cut thru it to the bushing housing of the diff. Then try to make a second and watch it grab the metal ring and pull it out for you! -at least that's how it worked for me on both sides. If that doesn't work you may need to chisel it out, but I bet the reciprocating saw gets it done. To be clear I didn't get a picture of the reciprocating saw or "sawzaw" but it is not the skill-saw that I did photograph.

New Powerflex Bushings are shown below the old cutout bushings
 
#10 · (Edited)
19. Removing the front bushing from the subframe***8230; ughhhhh. If you obtained the tool pictured then you will be confused like I was as to how it was supposed work. I eventually used the big hollow piece, the big bolt, and the nut on the old bushing on the passenger side, held in place with a giant-ass c-clamp to pull it thru. When you are pulling the old bushing thru you will hear ***8220;clicks***8221; or ***8220;chirps***8221; that sound like you broke a bolt or something bad happened. That***8217;s just the old bushing moving thru the subframe housing. Pull that baby out!!


#11 · (Edited)
20. Bushings are out so new ones go in. Follow the Powerflex directions to install the rear bushings, cliff notes: the aluminum side goes in from the front, the second half comes in from the rear, use the provided grease liberally everywhere that will move and gently tap into place with a rubber mallet. Easy. The rear is pretty easy too actually. Grease it the heck up and put the washer it comes with inserted from the driver side of the subframe with the washer facing the passenger side. Gently rubber mallet it into place. I found out the hard way not to try to add the washer after the bushing was in, that doesn***8217;t work. Have it on in the first place, grease up the bushing, and tap tap taparoo.

Public safety announcement: Test fit all 3 diff bolts into the diff before you go further. The rears should thread in finger strength as well as the front, all 3 all the way in with your hand. If you run into resistance that your hand can***8217;t get past, tap it. There***8217;s no point in forcing a bolt into your diff just to ***8220;finish the job***8221; if it means ruining your setup and potentially resulting in the bolt backing out on track/the road somewhere and endangering your life. As long as you can cleanly thread all 3 bolts into and out of the diff while it***8217;s out, proceed.


#12 · (Edited)
21. Now your bushings are in place and ready for the reinstallation process! (DO NOT TIGHTEN ANY OF THE 3 BOLTS UNTIL ALL THREE ARE THREADED) If you went with OEM bushings this should be very easy, just line up everything and put the bolts back in. BUT if you upgraded to Powerflex Polyurethane bushings like I did... You will have a live geometry exam going on for 45mins-2.5hrs most likely. I set the bar high so you're not frustrated and to feel like you're wayyyyyy better than me when you get the front bolt in, because that's the hard one here, of course I didn't have my awesome write up so don't get too snarky ;).

Utilize your jack or whatever you're lifting the diff with to get the front up into the subframe and the passenger rear bolt threaded, but only barely. Please look at the last picture in this post, see how the axles are resting in the diff output shaft but not threaded? They need to be like that as you install the diff mounts. It will be nearly impossible (or you will damage) the axles trying to force them in once the diff is mounted so keep note of that as you raise all of them up together If you have Powerflex you'll be using the bolt (19mm), crush washer, washer, and giant washer on the rear of the diff. You will NEED to have the bolts in with the giant washer up against the diff as you raise it up into position to get the front up in the subframe, you'll know that from the removal process of the limited room to use the ratchet on the oem torx bit and the fact that the Powerflex bolt is WAY longer due to the increased size of the bushing. So whatever it takes, get the passenger side rear diff bolt thru the bushing and SAFELY threaded into the mount with your hands, no forcing it! Once you have that in, and you are keeping the diff supported (thanks jack or really great friend!) go to the front of the diff and here's where alllllllllllllllll your time of the install will be, particularly with getting that front bolt threaded in without cross threading.
See my cross thread error and learn from it (thus PSA above this point):

Thought I had it because I could get about a centimeter in (paint penned the bolt when it started getting tough and backed it out, compared with oem bushing length, which are the same up front, and kept trying to push on thru some mythical burr in the female threads in the diff...). Well that resulted in a purchase of a big tap and die kit to pull the diff back down and clean up the inside threading and the bolt:


Once you have the passenger side bolt started (but not very far in) and the driverside bolt and washers in the bushing but not threaded, just clearing the body to be ready for install later, start working the front mount up to line up with the bushing. I had a transmission jack on the fins of the rear of the diff, a tall lift/jack I could adjust the height of on the front of the diff where the driveshaft attaches too, and a prybar on the driverside rear of the diff against the body helping to push the diff forwards and rotate towards the passenger side where the bushing is. I played around A LOT with the height of the rear of the bushing and the height of the front of the diff on the jack, all the time while prying to pull the diff forwards to make the whole line up for the front diff bushing bolt. This is actually the best time to have a buddy pushing, supporting, pitching, yawing, etc to get that bolt just right, because with the added material on the rear bushings, the front hole is hard to get lined up. Eventually I hit the sweet spot (using a flashlight behind me while I looked from the passenger side thru the bushing towards the diff to see the threads line up and using my left hand prying the diff forward while I hand threaded the 21mm bolt into the diff!!! Again, moral is that this is the most patient part of the whole damn process (followed by a close second of pulling out the front bushing).


After the front bolt is in raise the rear of the diff so the driverside bolt lines up and goes in. Now all 3 should be in. I couldn't get a tq wrench on any of the 3 bolts so I did the "think I'm about to break them force" and paint penned them for observation. Now you just reassemble!
 
#13 · (Edited)
22. Position the rear sway bar back up in the perches. I found it useful to start threading on the top bracket of the bushings to hold the bar at the right height and then reinstall the 17mm bolt and thread on the 13mm nut and tighten on each side. Start threading the bottom bushing bolt and hen tighten down all the bolts gradually or using your best judgement to not damage any threads and sort of equally bring them all tight.

 
#14 · (Edited)
23. Now reinstall each axle. Just like you wouldn***8217;t tq spec the first lug nut on your wheels before putting the other 5 on, go gradually, thread them all with your fingers, rotating around. The last thing you want to do is double thread one of these at this point! Carefully work your way around and then tq to spec on each side, once again using something non-abrasive against your wheel studs/lugs to counter the tq wrench.
 
#15 · (Edited)
Pictures stop now, you got this, just remember the correct order of reinstall!

24. Reinstall the small metal cover with the 10mm screws over the driverside front subframe bolt.

25. Reinstall the plastic cover on the passenger side.

26. Put the drive shaft back on, follow the same careful patient process as the axles. Start at the diff and then install back on the transmission. I supported the middle of the drive shaft with a transmission jack to get the diff side started and all but tq***8217;d on. Then I removed the trans jack and let the center drop enough at the joint to get the transmission side in, then put the center support shaft bracket washer/nuts on. Then put on the 3 18mm/19mm combo bolts into the guibo. Tq the diff side bolts to spec, I used a long pry bar to counter pressure the tq wrench by using the joint in the center of the drive shaft rather than the wheel studs/lugs. Tq or ***8220;tight as hell***8221; the guibo bolts. Tighten the center support shaft bracket.

27. Reinstall the wrinkly aluminum heat shield.
 
#16 · (Edited)
28. Install the front of the 2 black cross braces that go under the exhaust, 4 13mm bolts. Install the rear exhaust section to the muffler by raising the front side onto the black bracket to give yourself leverage to hold it on that end and bolt it onto the muffler, don***8217;t forget that donut gasket thing on the passenger side pipe meeting section. Install the second black bracket that has the exhaust hanger nuts for the exhaust, 4 13mm bolts and 2 13mm nuts.

29. Install the front exhaust. Put the front onto the pipes of the headers and start a bolt on one of the 6 rear bolts you***8217;ll use, don***8217;t forget those two triangular gaskets in-between. Complete the exhaust install.
 
#17 · (Edited)
30. Put your wheels back on and tq to your mojo, I like 86 ft/lbs for no reason.

31. Go home and eat/drink in celebration! I may have missed some reinstall details but as long as you don***8217;t have extra bolts or parts laying around and you paid attention to the uninstall, you should be good.
 
#18 · (Edited)
'Merica! (saved a few too many posts)
 
#19 ·
Just to check, can everyone see the pictures? On my work computer I don't see them (might be because photobucket is blocked) but on my cell phone I can. Just wanted to make sure I didn't need to re-host somewhere else.
 
#21 ·
Thank you for letting me know! And if anyone finds this helpful drop a comment in the thread, that will help people find it easier in the future on Google
 
#23 ·
Thanks!
 
#24 ·
where did you pick up the front differential bushing remover/installer tool? part number? the ones I find online usually states they are made for the E46 but for Non-M3's.
 
#27 ·
My buddy's shop had one from all the different bmw race cars we've built there. The tool I used (like most diff bushing tools) is relatively universal. I had to use a clamp to make this one line up. I'm sure there are better tools out there. But it looks like they're about $110 on ebay. I don't remember the part number, I might be at the shop tonight and will post a pic if so.
 
#25 ·
I know its old but see a new comment so its worth trying. But i have a question concerning the front diff bushing. Last spring i had a very reputable shop replace diff bushings along with other stuff and was under the car the other day and noticed that the front bushing looks as if out of place, like not in the little tube. It was hard to get a good angle, but i want to know if this doesnt look right to someone whos done the job. Thanks!
 
#28 ·
I know its old but see a new comment so its worth trying. But i have a question concerning the front diff bushing. Last spring i had a very reputable shop replace diff bushings along with other stuff and was under the car the other day and noticed that the front bushing looks as if out of place, like not in the little tube. It was hard to get a good angle, but i want to know if this doesnt look right to someone whos done the job. Thanks! View attachment 642365
That doesn't look correct to me. Can you confirm there is a bolt thru it?
 
#29 ·
if you drop the subframe then you can cut/hammer it out like I did the rear bushings, which is more labor but I think it will make getting the diff back in the subframe a lot easier and faster it just weights soooo much and I did this job almost completely solo.

If you're not dropping the subframe, you're going to have to come up with system of systematic leverage like a c-clamp would create but there really isn't room or a good place to try that and you'd still need a "tube" to pull the bushing into out of the housing while using a c-clamp. That's why the tools exist :dunno:
 
#35 ·
I don't know if it's too late but what was the size of the front bushing bolt you used because I went with the polyetherene bushings and the kit only came with two bolts for the rear bushings and none for the front. I might have to redo the whole thing and check the bolts because there is a loud clunk after each gear change

Sent from my SM-G925V using E46Fanatics mobile app
 
#36 ·
SMG? The loud clunk is normal ;) Try gearbox mode 3 with sports mode off for a while.

Are you talking about the subframe bolts? These are for the front of the subframe
https://www.ecstuning.com/b-genuine-bmw-parts/rear-subframe-bolt-priced-each/33326760360/
Your kit may just suggest changing the rear bolts


OP - great post, I'm probably not gunna tackle this work myself but it's good to see pics for most of the process. I will be changing the diff casing completely.