E46 Fanatics Forum banner

Dynavin D9 - New for 2024 - With Heads Up Display pod

1 reading
10K views 44 replies 13 participants last post by  Remkospek  
#1 · (Edited)
It seems like just yesterday I started This thread about the then new Dynavin D8 (actually it was 2 years ago) but I just saw there's now a new version, the Dynavin D9:

7-Zoll Android Navigationssystem D9-E46 Premium für BMW 3er E46 1998-2007

Image


One thing I immediately notice is it ships with what they called a "Heads Up Display". A little remote pod you can can stick in your line of sight for turn instructions, time of day, current speed or speed camera alerts. That's kinda cool.

Image


Looks like, in Europe at least, there'll again be the choice of a "premium" model, with all the functionality included, or a "flex", sold at half the initial price but with activation fees for some stuff.
 
#2 ·
No mention of the light sensor in the specs, so we don't know if that's been reintroduced having been absent in the D8. There's a lens for it in the casing but then there was for it on the D8 too. At the time I think someone said they blamed supply issues due Covid for its absence.

Would be nice to see it back, it works so well in my N6. Better than having it just dim with headlights when you have headlights on in daytime because of low winter sun, or drive through a short underpass that's lit well enough not to need headlights on but not daylight bright.
 
#4 ·
Anybody yet have experiences on the new d9 dynavin? Is it the best one to go for?

is the ”premium” one worth the extra $300 and whats the difference? Older Android and a slower CPU? Is the extra memory needed? I would use CarPlay and maybe some canbus app on the Android. Or is there use for the extra memory?

Can the memory be upgraded by a sd card or is it a soldering job?
 
#5 ·
The differences I touched on briefly in the OP. To flesh that out, with the Premium everything comes activated out of the box. With the Flex, the Android Auto/Apple CarPlay and the Google Playstore/built-in nav are each on a 30-day trial, after which you can choose whether to purchase them. Also, the max storage is higher on the Premium. Lastly, the FM radio has a triple tuner on the Premium rather than a double, if you still listen to radio. All explained in more detail on their site at Dynavin.de.

Bizarrely, it's cheaper to buy the Flex and enable the two options than to but the Premium. Unless you want to extra storage (which is probably only a larger SD card on the mobo) then I'd go for that one
 
#14 ·
Took delivery of and installed my D9 last week, took pictures along the way and thought I'd write up something up about the installation experience and first impressions. There seems to be plenty of guides out there, but none for the D9 with the HUD from what I can find, and I figure it can't hurt to have all (or most of them at least) the steps in the same place.

Decided on the Dynavin D9 as it seems to be one of the more polished options in terms of fit (with the rest of the interior) and function for a more modern infotainment experience. The HUD seemed like a nice bonus. Test drove a 330e a while back with a HUD which was a bigger game changer than I expected. Don't expect quite as good of an experience with this one as it doesn't show directly on the windshield, but probably a nice upgrade.

The unit and relocation bracket come nicely packaged, box clearly labeled Flex. Chose to get the flex to save some money and try to figure out what I actually want/need, as I have never had a car with anything other than a radio/music player. Some cheese in the background as a bonus.

Image


What's in the box!?
Image

Cables, HUD, antennas, etc. No surprises.
Image

Relocation bracket comes with some extra cables to connect one of the USBs straight to power. Might be usefull for some other applications.

HUD looks a lot like a smart watch, here next to my Polar Ignite 3.
Image


Installation time. Starting with disconnecting the negative terminal is a good idea to avoid damage to electronics. Also a good opportunity to replace your incomplete battery hold down.
Image


A before picture. If only I had some black trim as well.
Image


Started with disassembling everything that needed disassembly.
Some of the plastic trim holders did not want to stay in place, as is tradition. Used plastic trim removal tools to pry up and out. Thin ones worked the best for me.
Image


With the around the trim removed the journey continues to the trim around the shifter. Which should only need to be removed for the climate control relocation bracket.
Image


Knob just pulls out, a good opportunity to smack yourself in the face if it sits tight. Avoid getting random water on your windows switches.
Image


The leather boot around the shifter can be pried out with plastic trim removal tools, then pulls off.
Image


Having a nice ratcheting screwdriver comes in handy when you need to get screwed trim out.
Image


With the two screws out the trim piece can be lifted and cables unplugged, which are conveniently of different size and shape, so they can't be plugged wrong if you somehow where to manage getting them to the oppsite side.
Image


With the trim gone you can access the screws holding the sunglass compartment/cigarette lighter/heat seat button thing.
Image


Next up is the radio, it's only fastened by two screws on each side.
Image


With the screws removed the radio can be pulled out and cables disconnected. The big plug needs to have the lock pulled up, easiest done with a screwdriver.
Image
Image


Next up is pushing out the climate control panel, it takes more force than you probably want to use, but it comes out eventually. If no relocation bracket will be installed this is a good time to remove the sunglass compartment, which just pulls out, and routing the climate control cables to that area.
Image

Image


If a relocation bracket will be installed, this is a good time to pull out the cigarette lighter and seat heater bracket/assembly.

The switch row for the seat heaters and ASC (presumably DSC and other things if you have them) needs to be unplugged and sits with two screws, suddenly torx (T10).
Image

Image


The cigarette lighter outlet sits with plastic clips, not very easy to remove, required some prying with a screwdriver on the plastics (no pictures unfortunately).
Image


Next up, vent removal. Two screws at the bottom of the vent need to be removed, then pry with plastic removal tools between the dashboard and the top of the vent, down and out, using multiple tools can be helpful. Be careful and take your time to not break it, it comes out eventually. With the vent out of the way the two bottom corner screws for the radio/climate bracket needs to be removed and then it just pulls out. Some hairy legs as a bonus.
Image

Image


Now is a good time to start thinking about routing and placements for antennas and microphones. Decided to put the GPS antenna behind the sun roof buttons and reading lights as I don't want it visible and it seems to work for others.

Glove box needs to be removed to get space for routing, also a good space to put extra cable bundles and where to connect the reverse signal to get your PDC beeping. Glove box sits with 4 screws, I removed more to get the fastening bracket around out. More space for routing is nice to have.
Image
Image


TBC
 

Attachments

#15 ·
Next up A-pillar trim. If your car is conveniently missing the trim covering the screws and most of the screws, you will just have one (T25? Might have been T20) screw to remove. Loooong screw ahead. E30 making a cameo.
Image

Image


Onto the reading lights, rear view mirror is coming apart for some reason.
Image


Reading lights did not want to come out, but with a thicker sturdier tool it eventually pried out.
Image


Panel with sun roof button can simply be pushed out. With everything disassembled, the car looks like it's been robbed and left at the side of the road to die :(.
Image


With things looking their worst, installation can start. First up, relocation bracket. The USB cables that it comes with are nicely keyed and color coded.
Image


Cigarette lighter outlet required some fiddling to stick. Hole is keyed so no putting it in wrong (though it would likely not do anything if you did put it wrong).
Image


Button row screwed in place and cables connected, time to put it in place.
Image


With the bracket in place cables can be pulled towards their intended destinations
Image


Climate control panel in it's new home.
Image


Shifter trim and knob assembly goes in, reverse steps from disassembly.
Image


GPS antenna appears to have magnets in it, sticks to the body when placed against it. Routing of the cable goes easiest by pressing it between the headliner and windshield with a plastic trim removal tool until it pops in under the headliner.
Image

Image
Image


Existing cable holders along the A-pillar can be used for the GPS antenna cable to get a nice and tidy cable run that won't interfere with the airbag.
Image


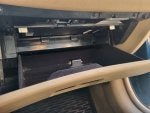
Getting the cable to the glove box area was easiest by pressing the cable between the dash and weather strip with a plastic trim removal tool.
Image

Image

Image


Trying to find the best place for the HUD, ended up with putting it to the left of the instrument cluster as it seemed like an easy place to get a somewhat clean cable run to. Can move it later if it turns out to not be great. The HUD came with extra VHB tape.
Image


Figured the microphone would work best if it was close to my speaking hole, so behind the steering wheel became its home. Also a very easy place to run the cable to, which is nice.
Image


A-pillar trim needed to be removed for cable routing to the HUD (which uses USB-C), same story as on the right side.
Image


Getting the cable from the center of the dash to the A-pillar seemed difficult, so I removed the instrument cluster to get more space for routing. Sits with two torx screws in the top.
Image


Lots of space now.
Image


Did not end up installing the DAB, there are no broadcasts where I live that use it and the old radio had a cable that fit the DAB connection on the D9, so maybe that's what it was, maybe not. No way to test right now.

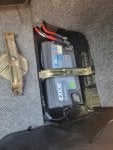
With all cables routed the D9 is prepared with cable harness, Wi-Fi antenna and radio antenna adapter.
Image


And into the car it goes.
Image


A good time to do some testing before putting everything back together. The HUD has eyes that "wake up" when you power it. Cute, I guess.
Image


It's working.
Image


Testing that the navigation gets GPS signal with the antenna location.
Image


Reassembly time, with fewer pictures as you get in a hurry and forget to take them. Everything goes back in the reverse order. There should be 4 extra screws from the old radio/climate control panel bracket that, these are no longer needed. Make a tasty screw sallad, or save them with everything else you removed in case you ever sell the car to someone who thinks only BMW original parts are acceptable or superior.

Realized I took no pictures of the finalized installation, will update with some pictures later.

The Dynavin D9 itself is a big improvement as expected, it starts quickly with radio playing a few seconds after start, navigation seems okay. The speed limits are mismatching on quite a few places near me, integration with the HUD is nice though, as you can have radio, Spotify or whatever up on the actual display and the HUD will still show turns ahead and other info. When not using navigation it just shows your current speed and speed limit if information is available and warns about speed cameras ahead, which is neat. HUD navigation seems to work with Google Maps as well, which is really nice, as I will probably end up relying only on that the few times I need navigation.

Microphone seems decent, better than what an Audi A4 B8 comes with from factory according to people I've tried it with, the location could be the determining factor.

Language oddly enough needs to be set to UK English and not US English if you want the HUD to display kmh instead of mph (thought UK used mph) . Probably shows kmh if you choose other European languages.

Steering wheel buttons stopped working after updating the firmware, so that will need some investigation I have not yet cared to do.

Overall seems like a good infotainment package, installation was fairly simple and took 3-4 hours for me.
 

Attachments

#16 ·
I've got a D9 pro currently sitting on my office floor waiting to be installed in my Compact. I mistakenly ordered the hvac relocation bracket as well, not realising they only made it for wrong hand drive. Got a plan though, I'm gonna try and take a dremel or similar to it to separate off the bracket for the HVAC and attach it to the one already in my car. If I can't do that, I have an eBay 3D printed one just in case (I've not heard good things about the fitment of the 3D printed ones, but I'm not spending £175 on an rhd relocation bracket!)

I have one question though, Eventually I'm going to fit an external amp and replace all the speakers. I was thinking of running all the RCA cables at the same time as the HU install, if I connect them to the back of the HU before installing the amp, will the factory speakers still work or will it automatically defer to sending via the pre-amps?
 
#20 ·
Measured it all out today (taking out all the unnecessary crap under there), there's space for an amp under there when mounted on some 9mm ply I have lying around. Can get the cabling for the audio there via the route used for the CD changer which will be removed at the same time I do this job. The pain will be routing the speaker cabling, but that shouldn't be too much hassle.
 
#23 ·
Hey Guys, to those of you that already have the D9 installed: is the dim function that adjust the screen brightness according to headlights off/on working well? How does it work with Auto headlights. Is the haptic if the Buttons and the General Material comparable to for example the Buttons of the climate Control? How is the startup behavior if I only want to use Apple car Play? Is there Like a Auto start Mode oder do I have to Click through the Weile Menu everytime to start it up. I would be really happy If someone could help me with answering this questions! :)
 
#26 ·
I was not aware that it had any functionality to adjust the brightness according to headlights. My car is currently enjoying hibernation during the winter but I could try to take a look when I go for a visit. It is too old to have auto headlights though. What I can say is that the brightness (on my unit at least) seems to live its own life and has to be adjusted manually occasionally, nothing big but a bit annoying.

Materials and button haptics are similar to what you can find in your car, pretty good for a relatively cheap unit.

Don't have an iPhone so can't speak to car play specifically but it usually boots to whatever was running when turned off. If you had navigation running it goes to navigation, radio to radio and so on, the exception being when it's been without power for a longer time when it will boot for slightly longer to the menu.
 
#24 ·
Has anyone tried the Wireless android auto?

Dynavin claims it has wireless AA on the top of the product page.
Once you go farther down it only claims it has wired AA.

I asked Dynavin if it does have wireless AA and about my D8 having Wireless AA.

This is the response from them "Yes, the D9 does wireless Android Auto. The D8 does as well but has some issues with certain phones particularly Samsung phones so I recommend the D9."
 
#29 ·
Just in the middle of installing mine. The steering wheel controls work fine, but I've not updated the firmware at all. The GPS test app seems to get a signal, but the built in Nav app didn't show a map. Maybe because I've not registered it or something?

Can confirm that with the RCA's plugged in to the back of the unit, but not hooked up to an amp, it still plays through the factory speakers.

Next step for me is to wire up the reversing camera and complete the wiring prep for the speaker and amp upgrade.

One problem for me though is that I have a broken PDC sensor and replacing one of those on a Compact is a bumper off job. And removing the bumper is not straight forward!

Thanks @elfer for the original write up! I had to make some adjustments as I went along due to the slight differences with the compact compared to the other body styles
 
#30 ·
@elfer or, in fact anyone who has done this swap, did you guys do the wiring to make the reversing camera/pdc screen work when engaging reverse?

I've emailed Dynavin support and they said there's a trigger wire (blue and yellow) in the big loom that runs front to back from the glovebox area. You apparently need to tap that wire and use it to feed a signal to the headunit. Problem is...there's more than one blue and yellow wire in that loom!!!!
 
#37 ·
Not long installed my D9 and all seems great so far, CarPlay connects within 20secs of turning on the ignition without any of my input which was what I wanted it for! I have come across a few minor issues which I'm not sure if anyone else has had any trouble with? First thing being that the dynavin navigation system doesn't seem to work without wifi even though the map files have been downloaded. Second is that I don't seem to be able to get it to work with the factory PDC. I have yet to install a backup camera but have spliced the trigger wires into the reverse circuit but still no luck. Has anyone else had any success with these issues?