This was performed on my 2003 325i.
Hello to every BMW/CAR enthusiast out there and thanks you for taking the time on checking out my first DIY (as i wasn't able to find this online). Also, thank you to all the DIYers and commenters everywhere as I have used a few DIY on this site so I want to pay it forward with mine.
Hopefully the title/description makes sense of what I would like to share as I am using references from RealOEM.com (awesome site!).This DIY will have pictures as i find DIY with pictures a lot more helpful. This is simple DIY and no special tools needed and can take under 20-30min (i bet even less). It took me about 45min as I had no clue on what i was doing and i was taking pictures along the way. I am not a mechanic nor do i have any past mechanic background/knowledge. With this being said this is really simple to do.
I placed my order with www.PelicanParts.com but don't forget to check out www.ecstuning.com (based in Ohio) and www.autohausaz.com (based in Arizona).
large/hi-res and more detailed images can be found on my drop box….
https://www.dropbox.com/sh/jg3p0jyu019xmmg/ktRukh8Dck
Downloadable versions
Word Format -
https://www.dropbox.com/s/ikzzv3lml...kzzv3lmlv1g62y/DIY-PictorialReplaceBTerminalpositiveconnectionunderthehood.docx
PDF Format -
https://www.dropbox.com/s/hj3yalral...hj3yalralcz34ca/DIY-PictorialReplaceBTerminalpositiveconnectionunderthehood.pdf
Web Site Format -
https://www.dropbox.com/s/qldb7esuv1v2g22/DIYPictorialReplaceBTerminal_positiveconnecti.html
If the links above don't work or have any questions please email me and let me know i can re-upload the images, fix the links and/or answer any questions you may have. My email address is phern007@gmail.com.
I believe my issue started to happen when I installed the MyCarr Angle Eyes Kit that i purchased from Bimmian.com as that is only time i have messed with the B+ terminal. However, it is a possibility it could be a relay or i just didn't properly install them correctly (instructions on the box suck) and i found the proper way of installing them on this site after my terminal became FUBAR.
![Image]()
the image above demonstrates the DIY before (below) and after (above)
Tools Needed:
Parts List and Diagram
![Image]()
link to diagram above: http://www.realoem.com/bmw/showparts.do?model=ET37&mospid=47720&btnr=61_1109&hg=61&fg=30
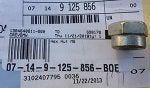
The correct part number for the Hex Nut M8 thread (#5):
Real OEM #07149125856
Pelican Parts# 07-14-9-125-856-BOE
![Image]()
B+ terminal point
(I haven’t replaced this...yet)
![Image]()
Link to diagram above:
http://www.realoem.com/bmw/showparts.do?model=ET37&mospid=47720&btnr=61_1765&hg=61&fg=15
The correct part number needed for the B+ terminal
(positive connection terminal under the hood)
Real OEM #61131382548
Pelican Part# 61-13-382-548-BOE
![Image]()
Lets begin the DIY:
1. Disconnect the battery using the 10mm socket.
![Image]()
![Image]()
Yup, thats a gel based Duralast battery and cardboard to keep a little more tension. I purchased the battery at my local auto parts store (Autozone) for $100 (regular $160-$200) due to my other Duralast battery failing, still under warranty and discontinued.
2. Remove the hex nut
![Image]()
![Image]()
(I know this is bad and luckily nothing major happened like my hood liner catching on fire or frying a part of my electrical system)
3. Remove hood sensor
![Image]()
4. Remove fastener
![Image]()
Dont use a screwdriver to pry out the fastener as it will break. I broke it due to not knowing what i was doing and also I purchased the fastener.
The back part and the front part slide out releasing the tension on the fastener.
Hopefully the image below makes sense.
![Image]()
![Image]()
5. Remove the weather strip out the way for step 6.
![Image]()
6. Remove the 13mm nut from the back of the B+ terminal
Tip: I found it easier to put it back where it goes to get more torque on removing and install the nut.
![Image]()
inspect the cable…. mine is good so no need to do anything.
![Image]()
7. Install new B+ terminal and connect back of the box.
![Image]()
8. install the fastener
Tip: install the fastener before putting on the back part.
Slide the back part down to secure the fastener in place.
![Image]()
![Image]()
9. connect the B+ hex nut and put back the weatherstip
![Image]()
10. Reconnect battery and you are done!
Hope you found this DIY useful.
Please feel free to comment and contact me if you need anything else.
Thanks and happy Tunning!
-Phern007_a_
Hello to every BMW/CAR enthusiast out there and thanks you for taking the time on checking out my first DIY (as i wasn't able to find this online). Also, thank you to all the DIYers and commenters everywhere as I have used a few DIY on this site so I want to pay it forward with mine.
Hopefully the title/description makes sense of what I would like to share as I am using references from RealOEM.com (awesome site!).This DIY will have pictures as i find DIY with pictures a lot more helpful. This is simple DIY and no special tools needed and can take under 20-30min (i bet even less). It took me about 45min as I had no clue on what i was doing and i was taking pictures along the way. I am not a mechanic nor do i have any past mechanic background/knowledge. With this being said this is really simple to do.
I placed my order with www.PelicanParts.com but don't forget to check out www.ecstuning.com (based in Ohio) and www.autohausaz.com (based in Arizona).
large/hi-res and more detailed images can be found on my drop box….
https://www.dropbox.com/sh/jg3p0jyu019xmmg/ktRukh8Dck
Downloadable versions
Word Format -
https://www.dropbox.com/s/ikzzv3lml...kzzv3lmlv1g62y/DIY-PictorialReplaceBTerminalpositiveconnectionunderthehood.docx
PDF Format -
https://www.dropbox.com/s/hj3yalral...hj3yalralcz34ca/DIY-PictorialReplaceBTerminalpositiveconnectionunderthehood.pdf
Web Site Format -
https://www.dropbox.com/s/qldb7esuv1v2g22/DIYPictorialReplaceBTerminal_positiveconnecti.html
If the links above don't work or have any questions please email me and let me know i can re-upload the images, fix the links and/or answer any questions you may have. My email address is phern007@gmail.com.
I believe my issue started to happen when I installed the MyCarr Angle Eyes Kit that i purchased from Bimmian.com as that is only time i have messed with the B+ terminal. However, it is a possibility it could be a relay or i just didn't properly install them correctly (instructions on the box suck) and i found the proper way of installing them on this site after my terminal became FUBAR.
the image above demonstrates the DIY before (below) and after (above)
Tools Needed:
- Rachet
- 10mm Socket
- 13mm Socket
- BMW Stock Channel Locks
- BMW Stock Screwdriver
Parts List and Diagram
link to diagram above: http://www.realoem.com/bmw/showparts.do?model=ET37&mospid=47720&btnr=61_1109&hg=61&fg=30
The correct part number for the Hex Nut M8 thread (#5):
Real OEM #07149125856
Pelican Parts# 07-14-9-125-856-BOE
B+ terminal point
(I haven’t replaced this...yet)
Link to diagram above:
http://www.realoem.com/bmw/showparts.do?model=ET37&mospid=47720&btnr=61_1765&hg=61&fg=15
The correct part number needed for the B+ terminal
(positive connection terminal under the hood)
Real OEM #61131382548
Pelican Part# 61-13-382-548-BOE
Lets begin the DIY:
1. Disconnect the battery using the 10mm socket.
Yup, thats a gel based Duralast battery and cardboard to keep a little more tension. I purchased the battery at my local auto parts store (Autozone) for $100 (regular $160-$200) due to my other Duralast battery failing, still under warranty and discontinued.
2. Remove the hex nut
(I know this is bad and luckily nothing major happened like my hood liner catching on fire or frying a part of my electrical system)
3. Remove hood sensor
4. Remove fastener
Dont use a screwdriver to pry out the fastener as it will break. I broke it due to not knowing what i was doing and also I purchased the fastener.
The back part and the front part slide out releasing the tension on the fastener.
Hopefully the image below makes sense.
5. Remove the weather strip out the way for step 6.
6. Remove the 13mm nut from the back of the B+ terminal
Tip: I found it easier to put it back where it goes to get more torque on removing and install the nut.
inspect the cable…. mine is good so no need to do anything.
7. Install new B+ terminal and connect back of the box.
8. install the fastener
Tip: install the fastener before putting on the back part.
Slide the back part down to secure the fastener in place.
9. connect the B+ hex nut and put back the weatherstip
10. Reconnect battery and you are done!
Hope you found this DIY useful.
Please feel free to comment and contact me if you need anything else.
Thanks and happy Tunning!
-Phern007_a_