I apologize if this has been posted already but I didn't find anything with my search. I bolded the instructions below because I noticed they would be easier to read if printed.
I purchased a 330Ci several months ago with what was apparently a non-OEM replacement windshield (it didn't have the BMW logo on it and the rain sensor "opening" appeared to have finger prints and bubbles in the adhesive).
I noticed from the time I acquired my car that the windshield wipers didn't work properly in the rain sensing mode and I attributed this to the poor adhesion interface between the rain sensor and windshield.
After browsing this site, the conventional school of thought appears to be that one should buy the OE windshield (with sensor or lens attached from the factory) or deal with a non-working rain sensor function.
After breaking open the plastic shroud around my rear view mirror, I took a look at the sensor and came up with a fix that seems to work just fine.
Some points to clarify first:
After accomplishing the above fix, the sensing function of the windshield wipers appears to work perfectly. I've had a number of BMWs in the family and don't notice any difference between the operation of my wipers and those which have not had the sensor disturbed.
Here is the rain sensor installed as I received the car. The fingerprint and air pockets are clearly visible. It's not hard to understand how this could distort the signal received by the sensor laying underneath the adhesive and lens..
![Image]()
Here is the 2 piece plastic shroud attached behind your rear view mirror. I simply pulled it apart at the seam using my hands. There isn't much tricky about it.
![Image]()
After removing the plastic shroud, it may be best to detach the rain sensor from the purple lens (uless your lens is barely attached to the windshield as was the case with mine).
Whether you choose to detatch the sensor from the lens or remove the sensor and lens as one assembly, the process is not difficult.
For either process, you'll have to disconnect the sensor's electrical connector first. The connector is obvious and is located on the upper passenger side of the rain sensor.
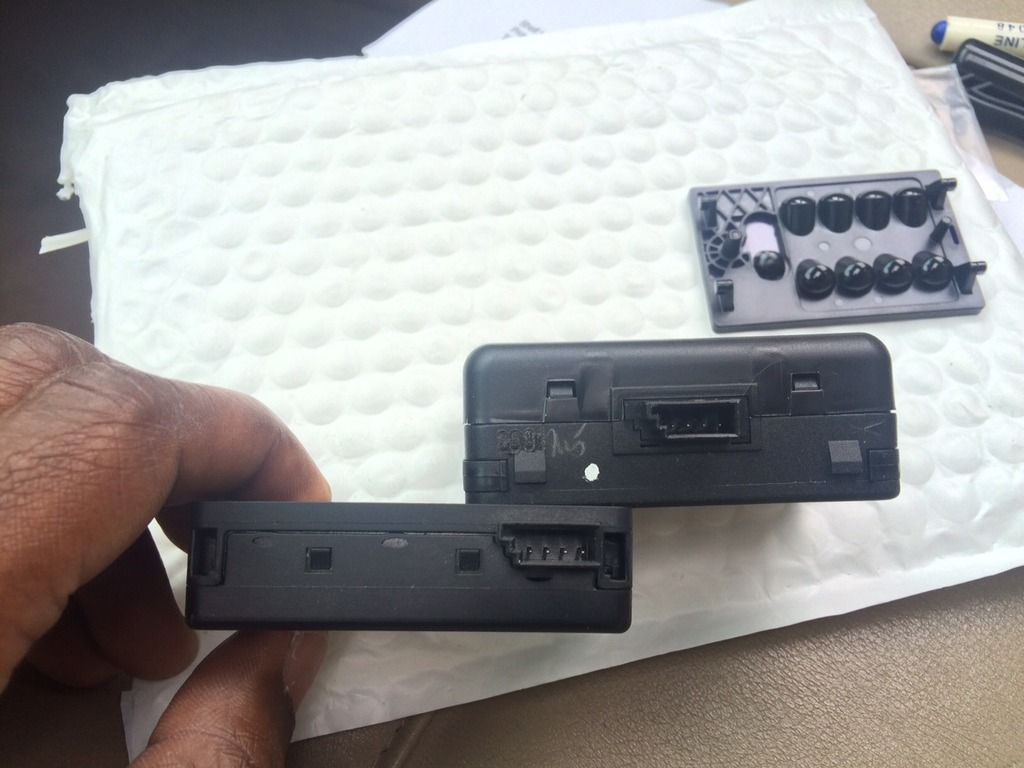
Because it was tough to get a good photo of the installed lens/sensor assembly, I've included a picture of me holding the sensor to illustrate the proper orientation. Obviously, this sensor is installed farther up the windshield behind the rear view mirror.
![Image]()
If you wish to remove both pieces together, simply pull/pry the sensor away from the windshield. If this isn't happening easily, I'd suggest detatching the sensor from the purple lens first.
To detach the sensor from the lens, push both sliding lock mechanisms as noted in the image below.
![Image]()
:read:Probably the most important step! Clean the purple lens and windshiled adhesive interfaces. Not only will this ensure proper bonding (probably the lesser concern), but it will promote a more transparent (bubble free) film of silicon between the lens and windshield.
Cleaning the windshield is fairly trivial but ensure that you use a good glass cleaner or alcohol to wipe any residue from the glass after all adhesive remnants are removed.
Clean the sensor using warm water, soap/goof-off, and patience. The adhesive film can mostly be removed by hand but some chemical or warm water will be needed for the last bit of residue.
No pics - sorry.
Apply the silicon adhesive to the purple lens element only. I figured it was better to let the silicon dry without the weight of the sensor attached. Although you might be ok to attach the lens and sensor together, it's easy to snap the sensor into place so I can't see why someone would bother taking the shortcut. In my case I was also about to take a nap between 12 hour night shifts and didn't want to wake up to a failed bonding job with silicon all over my dash.
Here is the silicon I used. I bought it at Advance Auto Parts for less than $4. It seemed to dry at least as clear as the original film/tape. I know some companies (GM) sell a "reattachment kit" for rain sensors but I figured the clear silicon would make an optical interface better than any imperfect application of clear tape. Given the akward angle and position at which the sensor is installed, I thought the silicon left more room for error.
![Image]()
![Image]()
Smear some silicon on the purple "lens" and press the lens onto the windshield. Ensure the orientation of the molded lens matches that of the properly oriented rain sensor. I applied a piece of tape over the lens while it dried. The tape is useless for applying meaningful pressure to the lens but might have saved my dash if the silicon bonding failed before drying (I laid a towel over my dash/console too).
:read:Note: The rain sensor shown below is (obviously) reversed but pay attention to your purple lens element to ensure that it is properly bonded to the windshield. In the event that you screw this up, you won't have enough cable slack to reattach you rain sensor to the improperly oriented lens. Fortunately, the silicon could be removed failry easily and this process repeated if you screw it up.
![Image]()
![Image]()
One tip:
In other applications the conventional wisdom is to apply minimum glue/adhesive necessary to ensure proper bonding. I began my lens installation by applying a modest amount of slicon, spreading it, and sticking the sensor to the windshield. After doing so, I had 2 small air bubbles in the adhesive. I pulled the lens element off and applied some extra silicon and the result was fine (with a slight amount of pressure needed to remove all but the trace bubble I mentioned below).
You don't need to use any significant fraction of the tube for this job but it won't hurt anything to apply more silicon than is "needed" to attach the lens to the windshield. You'll avoid air bubbles this way and it's not difficult to remove the silicon that is forced out from between the windshield/lens mating interface. For reference, the plastic shroud behind the rear view mirror easily concealed the excess silicon visible in my photos below. I saw no need to remove it.
Here is the lens reattached to the windshield with silicon adhesive. This shot is in direct sunlight and was taken before the silicon dried. After drying, the silicon had one VERY small visible air bubble that was probably 0.5mm or less in diameter. Because this bubble looked insignificant in size and was located away from the visible path of the sensing elements beneat the lens I didn't bother to remove and reapply the lens.
![Image]()
![Image]()
I apologize for the photo and writeup quality of this post. I did it in a hurry but I think it makes the point. I could have easily just said "use clear silicon" and I think most people could have managed this process just fine. I was up for 20hr when doing this and didn't have a photographer available. Handling the silicon and using a camera inside the car was a bit tricky. I would have taken my time with better (and more) photos if I were to do this again.
I work in the aero industry and I'm aware of a number of silicones that might work fine in this application. However, given the common availability of this Permatex 66B and the cheap price I'd recommend just sticking with it. My wipers work great now - your mileage may vary. For less than $10 in materials it's worth a shot if you bought a car with non-OE glass and an inoperative rain sensor function.
I purchased a 330Ci several months ago with what was apparently a non-OEM replacement windshield (it didn't have the BMW logo on it and the rain sensor "opening" appeared to have finger prints and bubbles in the adhesive).
I noticed from the time I acquired my car that the windshield wipers didn't work properly in the rain sensing mode and I attributed this to the poor adhesion interface between the rain sensor and windshield.
After browsing this site, the conventional school of thought appears to be that one should buy the OE windshield (with sensor or lens attached from the factory) or deal with a non-working rain sensor function.
After breaking open the plastic shroud around my rear view mirror, I took a look at the sensor and came up with a fix that seems to work just fine.
Some points to clarify first:
- The purple rain sensor "lens" is adhered to the windshield glass.
- A sensing element is attached to the purple lens using sliding clips. These clips can be detatched by pressing with a small instrument such as a jeweler's screwdriver. With my sensor detatched from the windshield I was able to release these clips using my fingers but this might be difficult given the angle and position of the sensor as installed.
- The adhesive used to apply the purple "lens" to the windshield glass appears to be a fairly thick gelatinous tape or a very precisely applied liquid sealant.
- The fundamental problem with most non-OE replacement windshields appears to be that the purple "lens" is reattached to the windshield imperfectly. I haven't had a windshield replaced myself but the replacement windshield that came with my car appears to have had the sensor/lens assembly reattached with the original adhesive "tape". Some of this "tape" appears to have been destroyed or left on the old windshield during the transfer.
- The air "bubbles" and finger prints resulting from reuse of the damaged tape probably cause some sort of optical/refractive discontinutiy that confuses the underlying sensor.
- I restored the optical quality of the windshield/lens interface by removing it from the old windshield, cleaning both surfaces thoroughly, and reattaching the purple lens element with clear silicon sealant.
After accomplishing the above fix, the sensing function of the windshield wipers appears to work perfectly. I've had a number of BMWs in the family and don't notice any difference between the operation of my wipers and those which have not had the sensor disturbed.
Here is the rain sensor installed as I received the car. The fingerprint and air pockets are clearly visible. It's not hard to understand how this could distort the signal received by the sensor laying underneath the adhesive and lens..
Here is the 2 piece plastic shroud attached behind your rear view mirror. I simply pulled it apart at the seam using my hands. There isn't much tricky about it.
After removing the plastic shroud, it may be best to detach the rain sensor from the purple lens (uless your lens is barely attached to the windshield as was the case with mine).
Whether you choose to detatch the sensor from the lens or remove the sensor and lens as one assembly, the process is not difficult.
For either process, you'll have to disconnect the sensor's electrical connector first. The connector is obvious and is located on the upper passenger side of the rain sensor.
Because it was tough to get a good photo of the installed lens/sensor assembly, I've included a picture of me holding the sensor to illustrate the proper orientation. Obviously, this sensor is installed farther up the windshield behind the rear view mirror.
If you wish to remove both pieces together, simply pull/pry the sensor away from the windshield. If this isn't happening easily, I'd suggest detatching the sensor from the purple lens first.
To detach the sensor from the lens, push both sliding lock mechanisms as noted in the image below.
:read:Probably the most important step! Clean the purple lens and windshiled adhesive interfaces. Not only will this ensure proper bonding (probably the lesser concern), but it will promote a more transparent (bubble free) film of silicon between the lens and windshield.
Cleaning the windshield is fairly trivial but ensure that you use a good glass cleaner or alcohol to wipe any residue from the glass after all adhesive remnants are removed.
Clean the sensor using warm water, soap/goof-off, and patience. The adhesive film can mostly be removed by hand but some chemical or warm water will be needed for the last bit of residue.
No pics - sorry.
Apply the silicon adhesive to the purple lens element only. I figured it was better to let the silicon dry without the weight of the sensor attached. Although you might be ok to attach the lens and sensor together, it's easy to snap the sensor into place so I can't see why someone would bother taking the shortcut. In my case I was also about to take a nap between 12 hour night shifts and didn't want to wake up to a failed bonding job with silicon all over my dash.
Here is the silicon I used. I bought it at Advance Auto Parts for less than $4. It seemed to dry at least as clear as the original film/tape. I know some companies (GM) sell a "reattachment kit" for rain sensors but I figured the clear silicon would make an optical interface better than any imperfect application of clear tape. Given the akward angle and position at which the sensor is installed, I thought the silicon left more room for error.
Smear some silicon on the purple "lens" and press the lens onto the windshield. Ensure the orientation of the molded lens matches that of the properly oriented rain sensor. I applied a piece of tape over the lens while it dried. The tape is useless for applying meaningful pressure to the lens but might have saved my dash if the silicon bonding failed before drying (I laid a towel over my dash/console too).
:read:Note: The rain sensor shown below is (obviously) reversed but pay attention to your purple lens element to ensure that it is properly bonded to the windshield. In the event that you screw this up, you won't have enough cable slack to reattach you rain sensor to the improperly oriented lens. Fortunately, the silicon could be removed failry easily and this process repeated if you screw it up.
One tip:
In other applications the conventional wisdom is to apply minimum glue/adhesive necessary to ensure proper bonding. I began my lens installation by applying a modest amount of slicon, spreading it, and sticking the sensor to the windshield. After doing so, I had 2 small air bubbles in the adhesive. I pulled the lens element off and applied some extra silicon and the result was fine (with a slight amount of pressure needed to remove all but the trace bubble I mentioned below).
You don't need to use any significant fraction of the tube for this job but it won't hurt anything to apply more silicon than is "needed" to attach the lens to the windshield. You'll avoid air bubbles this way and it's not difficult to remove the silicon that is forced out from between the windshield/lens mating interface. For reference, the plastic shroud behind the rear view mirror easily concealed the excess silicon visible in my photos below. I saw no need to remove it.
Here is the lens reattached to the windshield with silicon adhesive. This shot is in direct sunlight and was taken before the silicon dried. After drying, the silicon had one VERY small visible air bubble that was probably 0.5mm or less in diameter. Because this bubble looked insignificant in size and was located away from the visible path of the sensing elements beneat the lens I didn't bother to remove and reapply the lens.
I apologize for the photo and writeup quality of this post. I did it in a hurry but I think it makes the point. I could have easily just said "use clear silicon" and I think most people could have managed this process just fine. I was up for 20hr when doing this and didn't have a photographer available. Handling the silicon and using a camera inside the car was a bit tricky. I would have taken my time with better (and more) photos if I were to do this again.
I work in the aero industry and I'm aware of a number of silicones that might work fine in this application. However, given the common availability of this Permatex 66B and the cheap price I'd recommend just sticking with it. My wipers work great now - your mileage may vary. For less than $10 in materials it's worth a shot if you bought a car with non-OE glass and an inoperative rain sensor function.